watermelon margarita

watermelon margaritaMany years ago when I was single and living by myself it would not be uncommon to see a giant watermelon in my shopping cart.  Sure I could have purchased the pre-cut halves but then I would just go home, eat it and want more watermelon.  Not ashamed to say I would regularly devour a whole one by myself back in those days (I kept that information to myself on dates of course).

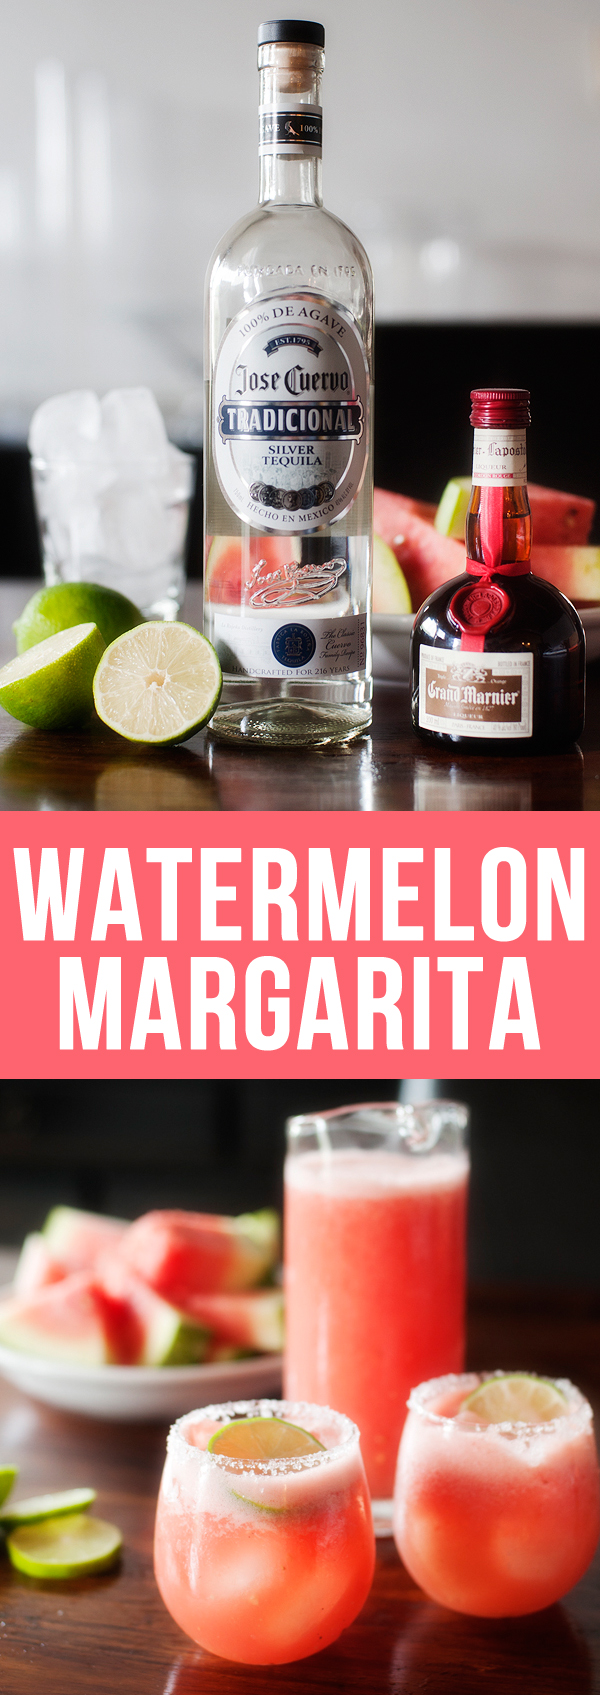
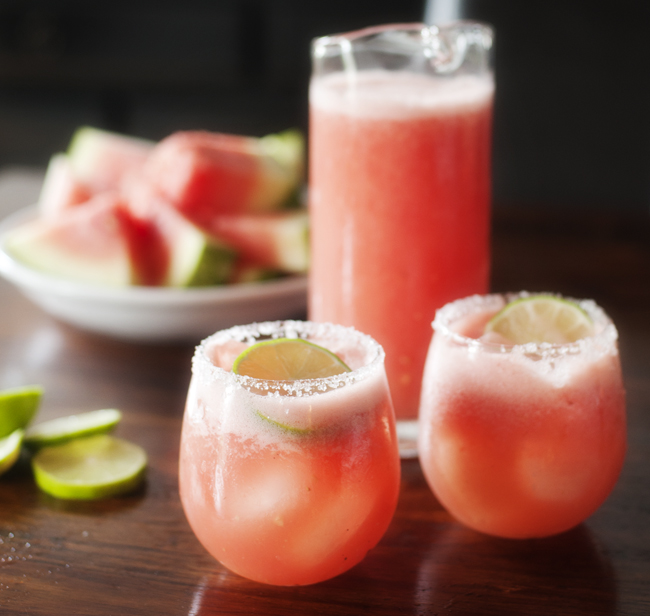
Today I still have quite the obsession with this gorgeous fruit but I am always looking for ways to mix it up a bit.  Enter the watermelon margarita – quite possibly the easiest cocktail I have ever made that packs the most amount of “WOW, that is tasty” factor.  Sweet but not too sweet watermelon with the tart lime and smooth tequila, seriously, so good.  A must try this summer, especially while entertaining friends.

watermelon margarita

Watermelon Margarita
 
Ingredients
  • Ripe seedless watermelon, cut into 1″ cubes (about 3-4 cups)
  • 2 limes, juiced
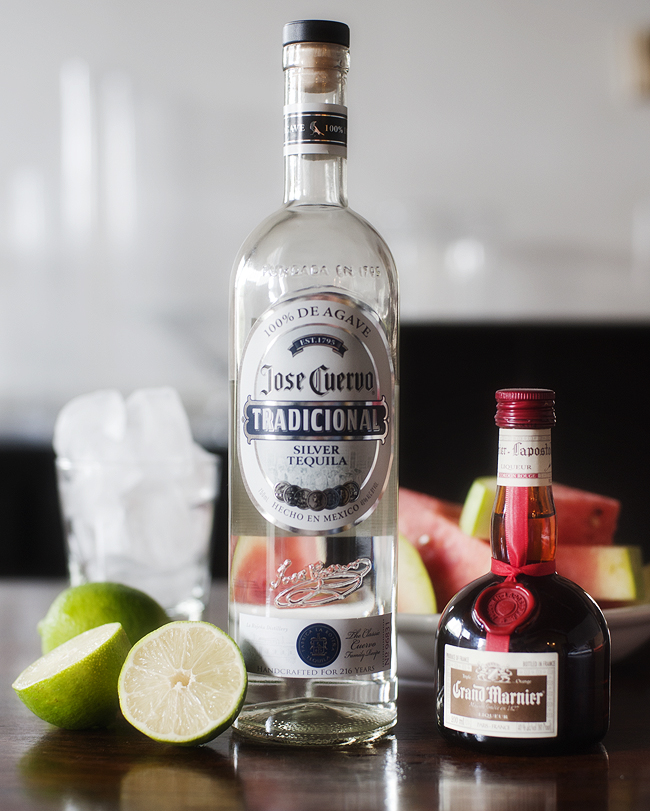
  • 4 ounces good quality white tequila
  • 2 ounces orange flavored liqueur (Cointreau or Grand Marnier)
  • Ice (2-3 cups)
  • lime, for glass rimming and garnish (optional)
  • course sea salt
  • simple syrup (optional)
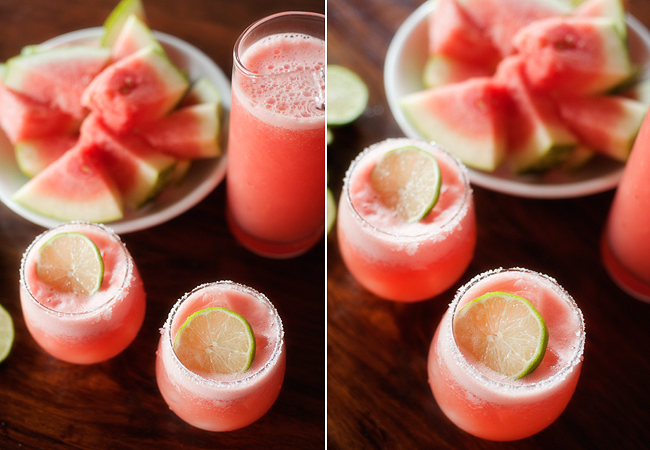
Instructions
  1. Rub lime around rim of glasses and dip in sea salt.
  2. Fill half a blender with the cubed watermelon. Add about 2 cups ice. Add the tequila, liqueur, and lime juice. Blend until watermelon is pureed & the ice is crushed.
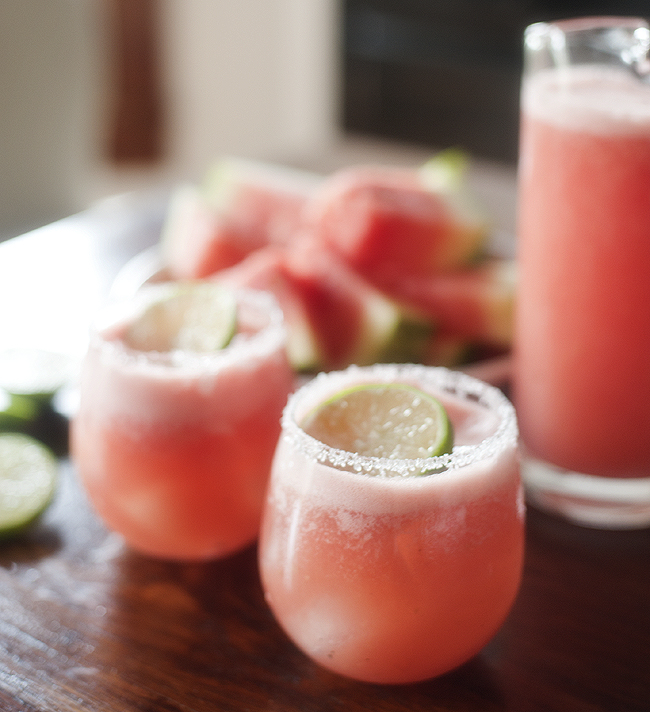
  3. Fill salt rimmed glasses with ice, pour the margarita over and garnish with lime (if desired). If your watermelon is not particularly sweet you can add some simple syrup, or superfine sugar to the blender.
Nutrition Information
Serving size: 4

adapted from the The Parsley Thief

watermelon margaritaIf you are a “no salt” person when ordering margaritas then by all means omit the salt.  I personally think rimming with sugar would be too sweet with this concoction but if you are feeling it then by all means go for it.

Depending on the size of your glass this recipe may make well over 4 servings.  It holds up well in the refrigerator, just give it a good stir before pouring.

watermelon margaritaAfter loving how this margarita turned out I am very curious as to what honey dew or cantaloupe may taste like in the same manner.  You may be seeing those in the future, that is if I ever stop making this pink perfection.

Cheers to Memorial Day weekend and the ideal margarita to kick off summer.  Enjoy everyone!

brandyjsig


“http://prettyplainjanes.com/wp-content/uploads/2013/09/watermelon_margarita_pinjpg.jpg”>Watermelon Margarita
Posted in cheers!, Cinco de Mayo, recipes | Tagged | 20 Comments

a diy dollar store chalkboard

I’m not sure when chalkboards became all the rage- but I stand guilty of loving them with the rest of the world.  They are so versatile, fun, and easy to make!  I’ve been itching to turn something into a chalkboard and when I came across this pretty little dollar store tray, it was screaming “TURN ME INTO A CHALKBOARD!”.  Okay, not really… but you know what I mean.  

diy_chalkboard_plate_3

Here is what you will need:

  • a silver tray (I found this one at Dollar Tree!)
  • chalkboard paint (actual paint, not the spray paint version!)
  • craft paint in any color
  • a sponge-paint applicator
  • an angled paintbrush
  • painters tape (optional, if you are messy)

diy_chalkboard_plate_1

I started by painting the chalkboard section, and it needed about 3 to 4 layers.  Be sure to let each layer dry completely before painting the next.  Once you are happy with the appearance, let dry for a full 24 hours before applying any chalk or painters tape!  Once dry, use an angled brush to pain around the frame.

I was looking for something to use as a little space to leave notes for Josh in the morning, so I added a magnet to the back using a hot glue gun- and voila!- it became a perfectly sized refrigerator chalkboard!

diy_chalkboard_plate_2

A few tips for diy chalkboards and applying chalk:

  • Before using your chalkboard (once the 24 hours is complete) be sure to prep your board by flipping your chalk the long way and rubbing it completely over the surface.  Erase, and you are free to begin normal use!  This protects it from “staining” when you use it the first couple of times.
  • Use a proper eraser or dry washcloth.  Do not use any kind of cleaning solution on the board that is not approved for use on chalkboards.
  • To get the chalk to appear really bold, dip it in water before writing.  It will look very light as you are writing but will brighten as it dries.
  • A paintbrush or q-tip dipped in water will fix any mistakes you make along the way without having to completely erase.
  • Love what you created?  Spray an even layer of hairspray over your finished image/ text to help it last without smudging or fading.  (Yeah, I know right.  Hairspray!)

Happy painting!

shansig


Posted in abode, diy | Tagged | 4 Comments

jettie’s strawberry cookies

This past weekend was Jettie’s second birthday celebration, and I needed to whip her up something special.  With a fruit stand theme- these cookies could not have been more perfect.  I adapted the recipe just slightly, because if you have not figured out by now I am crazy about some browned butter- and I thought that it might put these right over the edge from good to incredible.  It did.  The plate was empty before long and I was wishing I had made a double batch.

strawberry_cookies_4These cookies were sort of outside the box for me.  I make citrus cookies with zest and juice- but these are filled with actual strawberry chunks!  And no chips?! I wasn’t sure what to expect, but couldn’t have been more pleased with the results.  A new summer favorite for sure.

strawberry_cookies_1

Strawberry Cookies
 
Serves: 18 cookies
Ingredients
  • 1½ sticks unsalted butter, browned and cooled to room temperature
  • ½ cup brown sugar, packed
  • ¼ cup + 2 tbsp white sugar
  • ½ tsp vanilla
  • 1 egg
  • 1¼ cup all purpose flour
  • ¼ tsp baking soda
  • ½ tsp salt
  • 9 oz strawberries
Instructions
  1. Preheat oven to 350F, and line two baking sheets with parchment paper.
  2. Hall and slice strawberries, blot dry with paper towels, and set aside.
  3. In mixing bowl cream browned butter and sugars. Scrape down sides and then add egg and vanilla until well incorporated. In a separate bowl, combine all dry ingredients (flour, baking soda, salt) and whisk well to combine. Using a wooden or sturdy spoon, gently stir dry ingredients into the wet ingredients. Again, blot dry your strawberries to eliminate as much excess juice as possible, and then fold them into the batter.
  4. Bake about 13 minutes, until cookies are golden and the center of the cookie does not appear to be wet.

adapted from Butter Baking

strawberry_cookies_3Because of the fresh fruit, these cookies are best the day they are made- they get a bit soggy on the second day.  The original recipe called for soaking the strawberries in sugar before baking, but I omitted this step the second time I made them for a few reasons.  One being that the strawberries I had on hand were very ripe and sweet on their own- and two I thought it added to the strawberries being too juicy.  If your strawberries are not as sweet-by all means give it a try!  They were yummy both ways!

shansig


Posted in recipes, something sweet | Tagged | 9 Comments

diy coffee facial

Around here, we love a good cup of coffee.  Thanks to sites like Pinterest, we are finding all sorts of interesting uses for coffee.  Our most interesting find?  This facial.

coffee_scrub_2First of all- you most likely already have everything you need (which is awesome.)  Second- We know what you are thinking.  Coffee grounds? On my face?  Just trust us.

Coffee grounds are actually really great for your skin due to the high volume of caffeine.  It is potent with anti-inflammatory properties which does wonders for redness and those bags under your eyes.  (But be careful-  you don’t want to get this IN your eyes!)  Caffeine also soothes irritation, further reducing redness and promoting an even skin tone.  And, it smells fabulous.

Ingredients & Directions:

  • coffee beans
  • mortar and pestle, or anything that will work to crush your beans
  • almond milk, milk, or yogurt

Crush coffee beans and mix with about a tablespoon of milk, until a paste-like texture is achieved.

coffee_scrub_1

Spread mixture evenly over face, avoiding close eye area.  Leave on about 20 minutes, and lightly wash off when complete.  How easy is that?

This simple at-home facial leaves you with soft, rejuvenated skin- we love it!


Posted in beauty, diy | Tagged | Leave a comment

dots and denim

denim_on_denim_1The plan was to post my look for Jettie’s birthday party today.  Managing to have everything ready before guests arrived (a small miracle) it did totally slip my mind to photograph my outfit.  She had a fruit stand themed party – feel free to use your imagination as what one might wear to such an event.  The day was fabulous, her decor came out even better than I could have ever imagined and we truly do have the best family and friends to celebrate with.

This morning I am still feeling the party exhaustion along with your typical Monday blah.  Nothing other than errands to run today so I opted for easy cut-offs a spotted chambray and low heel sandals.  It’s no fruit stand ensemble but it is perfect for a boring old weekday.

denim_on_denim_2 denim_on_denim_4 denim_on_denim_5|WEARING| polka dot chambray top similar/cut-offs DIY from the glamourai/sandals similar/aviator sunnies similar


brandyjsig

Posted in outfits, style | Tagged | Leave a comment