our summer book list

summer_reads_1With toddlers, you rarely get to throw your shades on at the pool and get lost in a good book.  But, if by freak chance it happens, here is our summer “to-read” list.  What’s on yours?

Shan’s List: Weird: Because Normal Isn’t Working ,  The Power Of Starting Something Stupid, & Fearless

Brandy J’s List:  The TAO of MarthaWhere’d You Go, Bernadette,  & Eleanor & Park

Posted in Uncategorized | Tagged | 3 Comments

diy striped curtains – part one

Ok, ok, I know – there are MANY DIY striped curtains out there, this is not new.  But when I was looking over 2 years ago there were significantly less so let’s just pretend that this is then and not now.  If you have never came across a DIY of striped curtains then forget what I just said and continue reading as if I am some sort of DIY phenom.  It’s not the truth, made evident by this post, but for a few short seconds you will believe it and that’s good enough for me.

diy_striped_curtain_7
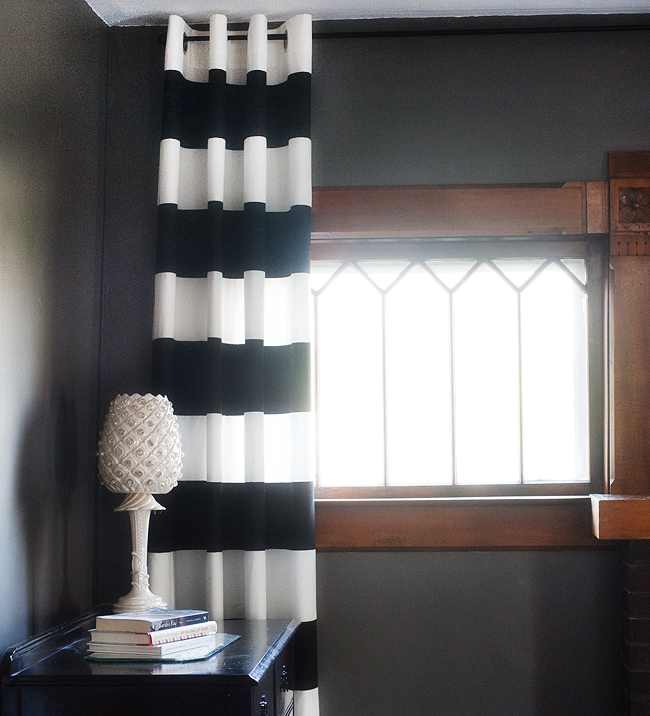
My living room is a very dark grey on 3 walls with a heavenly mass amount of natural light.  2 years ago while painting the room Sticky asked me what we would do about curtains (not that he would normally care but the morning light restricts Sports Center viewing while the evening restricts the Reds) .  I proudly exclaimed my plan for a bold stripe that was not only going to be fabulous but budget friendly as well.  He was on board and said “well let’s get them going because it sucks not having curtains in here.”.  A few days later my aunt picked up 3 packs of the infamous Ikea canvas curtains and I was ready to go.  This week I broke open the first pack, clearly I am speedster when it comes to home projects.

You may be wondering why this is “Part One” of what I hope to be a two part series.  There are several reasons, which I will elude to in the process section, but basically I want to try a few things differently than I did on my first attempt.  This means only one panel is finished, hoping the other 5 make it up before Halloween.

diy_striped_curtain_1DIY Striped Curtains (attempt 1)
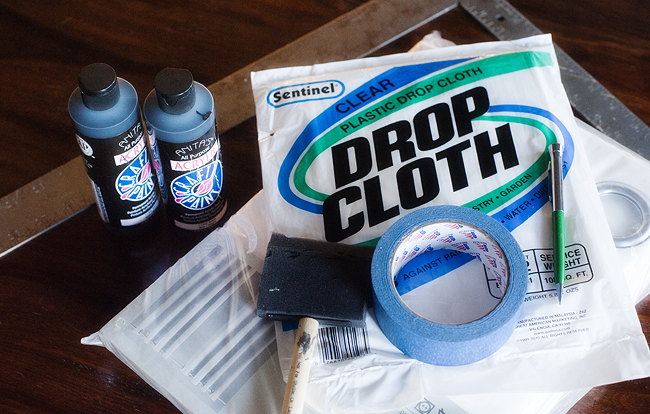
Supplies:

  • Cotton curtains (I used Ikea’s Mereta Curtains)
  • Acrylic paint
  • Paint pan
  • Painter’s tape
  • Plastic drop cloth
  • Foam brush (many DIY’s use a foam roller, this did not do the trick for me)
  • Pencil
  • Ruler
  • Iron and ironing board

diy_striped_curtain_2

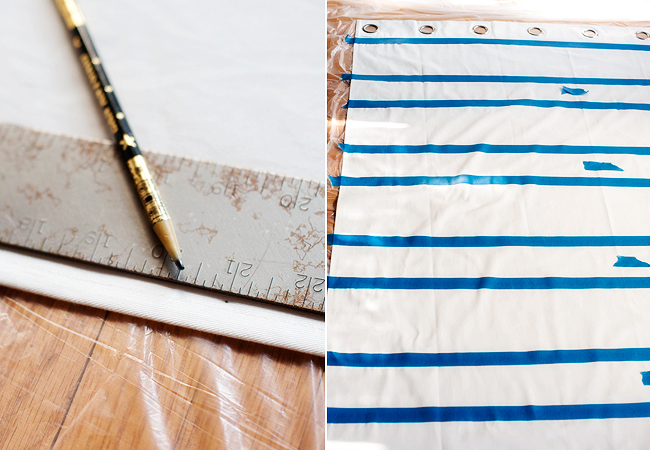
1.  Iron your curtains and lay them on a plastic drop cloth covered surface.  My iron showed up broke to this project so I zapped them in the wrinkle release cycle of my dryer, worked good enough for me.

2.  Beginning from the top,  mark the left and right hand side of each panel with a ruler and pencil.  I started 6″ from the top and marked every 7″.

3.  Using the marks, place painters tape from one side of panel to the other.  My arms are pretty long which made this fairly easy to do myself, if you struggle with stretching the tape across you may want to ask a friend to help you.  Be sure to place the tape on the side of the mark where the unpainted stripe will be.  Place a small piece of tape on the stripes to remain unpainted to help ensure you won’t accidentally paint them (something I miraculously did not do).  Press tape firmly down.

diy_striped_curtain_3 diy_striped_curtain_5

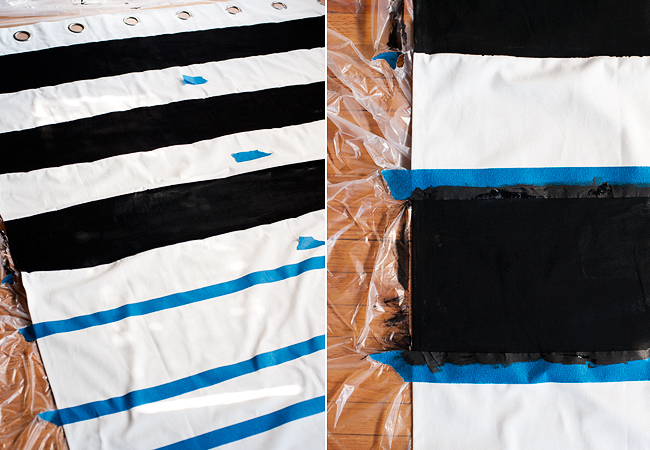
4.  Pour paint into your pan and begin painting (you may want to give the tape another good press right before painting).  To avoid bleed under tape be sure to paint on top of the tape near the edge and not from the side.

5.  After each stripe is painted, say a little pray and pull the tape from the curtain while paint is still wet.

6.  Allow to dry, hang and then marvel at your masterpiece.

diy_striped_curtain_4A few things I would like to correct that made me sigh and go “what?!” during this project:

1.  The tape would adhere to the plastic like it’s life depended on it.  When I would go to swiftly yet carefully pull the tape it would be a struggle to remove it from the drop cloth.  Not only that but the tape would have some wet paint on it which would then transfer to my hands which would then of course accidentally smudge somewhere it shouldn’t.  Next time I will wrap it around the edge of curtain or find a tape that doesn’t stick to plastic in the same way.

2.  I am mad at the tape again because while it stuck to the plastic with super power force it still allowed some paint to seep through on the fabric.  It’s a real buzz kill when you are lifting the tape and you see those little hills of “ha, ha, it’s not perfect!”.

3.  On the floor the stripes look solid, no spot left unpainted.  When they are hanging and the sun is shining through them, you can see little white specks of light making it’s way through which sounds minimal but they really stand out even from a distance.  I can hear myself explaining to people now why they do that (because I assume that is the only thing people can see which the reality is they probably don’t even care).

My next panel I am going to try at least a different brand of painters tape if not frog tape.  I am also going to mix my paint with a textile medium to make it softer to the touch and hopefully cover the fabric even better.  I may even try using latex paint as many DIY-er’s have suggested.  There are 5 more panels to be done and with the amount of paint just this one used I am thinking latex may be more cost effective.

diy_striped_curtain_6The beauty of this project is that when hung the little imperfections on the edges of the stripes are not even noticeable.  What is noticeable is that the full length of the panel is a little short to go from ceiling to floor.  Since the next color of stripe would be white I am going to try to add some fabric to the bottom so that it hits just 1″ above the floor.  I also want the curtain to be more to the left, Sticky will be so thrilled to move it.

While I want to make some changes all in all I am pleased with the outcome and actually can’t wait to get started on the rest of my panels.  It’s such a tease just to have one up because I really love how it looks in the room and can’t wait to see them all hanging.  And don’t worry, I plan on putting something on the wall above that dresser.  I have no idea what yet but I’m working on it…

brandyjsig


Posted in abode, diy | Tagged | 8 Comments

buttered pecan maple ice cream

Ice cream making is uncharted territory for me- but now that summertime has rolled in I knew it would not be long before I gave it a try.  Our good friends Cassity and Zach surprised us this year for Christmas with the ice cream bowl attachment for my Kitchen-aid, and we were beyond excited about it.  Six months later, I finally pulled it out of my freezer and put it to good use.  Of course, the week that I am on the detox and can not have one bite.  Torture.  I assure you though, it was tasted and loved by many- just not me.

pecan_maple_ice_cream_4

Buttered Pecan Maple Ice Cream

Recipe by Epicurious, Makes 1 Quart

Ingredients:

  • 3/4 cup pecans
  • 1 tablespoon unsalted butter
  • 2 cups heavy cream
  • 1/2 cup milk
  • 3/4 cup pure maple syrup
  • 1/8 teaspoon salt
  • 3 large egg yolks
  • 1/2 teaspoon maple extract

pecan_maple_ice_cream_1

Directions:

Coarsely chop pecans. In a skillet melt butter over moderate heat until foam subsides. Toast pecans in butter, stirring occasionally, until golden and fragrant, about 5 minutes, and sprinkle with salt to taste. Cool pecans and chill in a sealable plastic bag. Buttered pecans may be made 3 days ahead and chilled.

In a heavy saucepan bring cream, milk, maple syrup, and salt just to a boil, stirring occasionally. In a bowl beat yolks until smooth. Add hot cream mixture to yolks in a slow stream, whisking, and pour into pan. Cook custard over moderately low heat, stirring constantly, until a thermometer registers 170° F. Pour custard through a sieve into a clean bowl and cool. Stir in extract. Chill custard, its surface covered with plastic wrap, at least 3 hours, or until cold, and up to 1 day.

Follow the instructions specific to your ice cream maker- mine instructed me to slowly pour ice cream (still liquid at this point) into frozen bowl, as it was in “stir” mode, and to let stir about 20 minutes until desired texture is achieved.  Transfer ice cream to a bowl and fold in chilled pecans. Transfer ice cream to an airtight container and put in freezer to harden. Ice cream may be made 1 week ahead.

pecan_maple_ice_cream_2

I was so surprised at how simple this ice cream was to make.  Last week guest jane Vicki posted an incredible bread pudding (that I DID taste, and it was delish) and I can only imagine the insane goodness that would come if you combined the two recipes!

shansig


Posted in recipes, something sweet | Tagged | 2 Comments

an australian detox for us

Detox or cleanse – two words that you may have heard more frequently the last 5+ years. Seems like everyone has tried one or is thinking about trying one and I can’t say I blame them, they really can make you feel good and boost your drive to be healthy. The first time I did mine I clearly was determined because I chose to do it during a trip to Grand Caymans (I know, what in the world was I thinking?!). Needless to say I survived without cheating and became a total believer in the detox method.

welcome_banner

Shan and I started the same detox last Tuesday. She was looking for something to kick start a healthy lifestyle and I was in the mood for a tune up. We are following the shopping list for Detox Australia – an all natural approach that eliminates all wheat products, processed foods, meat (except organic fish), dairy, caffeine, sugars and alcohol from your diet. Basically all the fun stuff (well except the meat for me). I like this detox because it requires no supplements, powders or any other specialty products – it’s just a smart trip to the market with your shopping list in hand. If you are looking for something where you can decide the length of time, is low maintenance and effective this is the detox for you.

A few tips:

  • Be Prepared – Stock your house with foods from the shopping list the day before your detox begins. Make sure you have variety. Shan had a Guinness pretzel truffle slip due to lack of food and variety in her first day of detox. She started over after a good trip to the grocery.
  • Mind must be focused and determined. Detox does not work if you sneak a bite or a sip of something. You will not feel all the benefits which includes the sense of accomplishment from completing a cleanse.
  • It gets worse before it gets better. You may experience exhaustion or migraines from the lack of caffeine/sugar the first few days. This is short term and once it passes is when you really start to feel the good from the detox.
  • Keep food with you at all times. You never know when you will be next to a box of donuts or beside someone eating fries. If you at least have some almonds or dried fruit to snack on you can keep your hands and mouth busy and resist the temptation.

Another tip for detoxing is having an arsenal of recipes on hand to keep things interesting so that you are not just eating fruits and nuts everyday. Here are a few I like:

australian_detox_3

Toasted Oats with Fruit

  • 1/2 cup of whole oats
  • handful of nuts (optional)
  • 1 teaspoon of raw honey
  • 2 tablespoons of coconut oil
  • 1/2 cup unsweetened almond milk
  • fresh fruit (such as strawberries of blueberries)

Preheat oven to 350 degrees. Mix whole oats, nuts, honey and coconut oil and spread on a cookie sheet. Place in oven for around 10 minutes until it is golden and smells nutty (stir with a spatula every 2 minutes to avoid burning). Place cooled oats in bowl and pour milk over. Top with fruit and enjoy a satisfying breakfast.

australian_detox_2

Green Smoothie

  • 1 to 1 1/2 cups of unsweetened liquid (almond, rice or coconut milk)
  • an extra large handful of greens (spinach, kale, beet greens, swiss chard, collards)
  • 1 to 2 cups of fresh or frozen fruit (apples, blueberries, strawberries, melon, raspberries, mango, blackberries)
  • optional supercharge ingredient (chia seeds, ground flax seeds, avocado, coconut oil, cinnamon – as many as you would like and adjust the amount to taste)

Blend your concoction and serve over ice if making a thinner smoothie (depends on the amount of liquid you use). This is meant to be a mix and match recipe allowing you to use what you have on hand and change up the taste from day to day.

australian_detox_1

Black Bean Salad over Avocado

  • 1 can of rinsed black beans
  • 1 jalapeno seeded and minced
  • 1 garlic clove minced
  • 1/4 of small red onion minced
  • tablespoon of cumin
  • tablespoon of olive oil
  • juice of 1 lime
  • handful of cilantro chopped
  • 1/2 avocado

Mix all ingredients excluding the avocado in a bowl. Spoon over avocado and enjoy. Also good topped with pico de gallo or homemade salsa. Chop the entire avocado and mix with beans if you want to serve entire dish as a salad.

Our detox is coming to a close in just a few days. There are certain things I extremely miss and will eagerly consume after this is over (like COFFEE). Breads, pastas or anything processed – not even craving one bit. This is why detoxing is such a great kick start to living healthy. If you want to feel good or are about to begin a regimen of eating better and exercising I highly suggest finding a detox that works for you. You’ll thank Shan and I later (or curse us during your caffeine withdrawal migraine).

brandyjsig


* Highly suggest speaking with your doctor before beginning any detox.
Posted in health & fitness | Tagged | 7 Comments

diy neon pumps

diy_neon_pumps_2In Spring 2012 we were reintroduced to neon.  Being a child from the 80s I was not quite sold on the trend at first – after all I had already done the neon jelly bracelets, gym shorts and paint splash shirts, I was not doing it again.  This time around though it came in the form of mostly scarves, clutches and my favorite, shoes.  So many fashion bloggers I follow have been zapping their otherwise neutral outfits to life with these bold pieces.  I wanted in on the neon pump action but not for the prices I was finding.  Enter old pair of pumps, spray paint and a girl’s determination for some new shoes.

diy_neon_pumps_1

You will need:

  • Pair of pumps (Discount or thrift store is a great place to look to keep this diy on the inexpensive side.  I used a pair of loved ZiGiny pumps that the tip of the toe had started to wear.  Lucky me the same pair is still on sale so I can have my neon and pewter pumps.)
  • Indoor/Outdoor spray in your favorite bold color
  • Tape
  • Old magazine or newspaper

diy_neon_pumps_4

Process:

  1. Tape off parts of the shoe you do not want the paint to reach (typically the soles).
  2. Line inside of shoe with tear outs from a magazine or newspaper.  A little spray may still seep in but at least it will mostly be protected.  Tape the entire inside if you do not want any paint to show.
  3. Place the shoes on top of a protected surface in a well ventilated area.
  4. Spray away.  You will want to spray thin layers and go back every 15 minutes to spray on the next (depending on the brand of spray paint you use you may need to wait longer).  Mine took about 4 coats.
  5. When you have reached the desired color let dry overnight.

diy_neon_pumps_3

WEARING grey top similar/polka dot denim similar/brown bag similar

The results are even better than I expected and all for under $6 (a really nice stranger randomly approached me in Hobby Lobby with a 40% off coupon, it was cheap diy fate).  I have yet to wear them extensively in order to judge wear and tear but from what I can tell so far they should hold up fairly well (will let you know otherwise via instagram).

I am now pondering what else old I can spray paint new.  There’s an old pair of sandals in my closet begging to be color-blocked and a boring clutch that could use a few stripes, hmm….

brandyjsig


Posted in diy, outfits, style | Tagged | 4 Comments