eighteen weeks

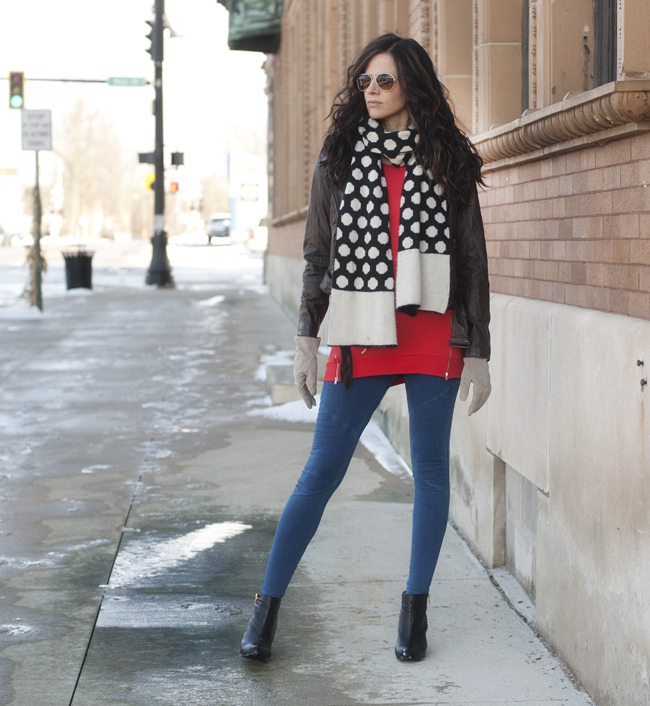
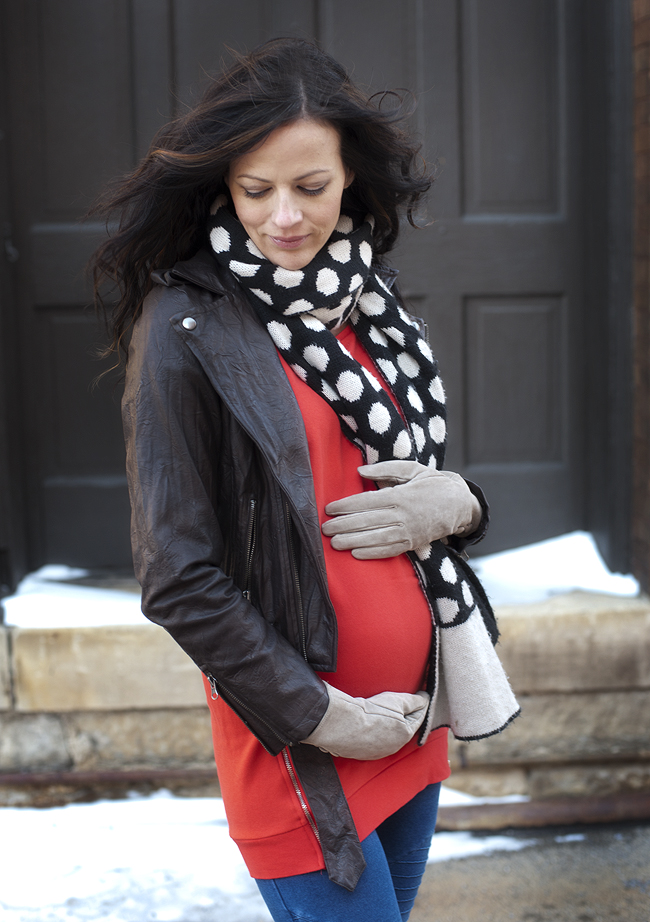
Jeggings, long sweatshirt and scarf – the official wardrobe for the first half of my 2nd trimester.  Pregnant or not a long cozy sweatshirt is just about the most comfortable thing a girl can slide on, no?  Especially now that they are made to fit women and not just giant square shaped men.  This particular one has been perfect for my bump which hasn’t quite reached maternity shirt status yet.  I love it so much in fact I purchased another shade (something I rarely do).  They are rotated and both worn weekly.  It’s winter, I am hibernating so yes I am going to wear my most favorite comfy clothes over and over again.

eighteen_weeks_1 eighteen_weeks_2eighteen_weeks_4a eighteen_weeks_3|
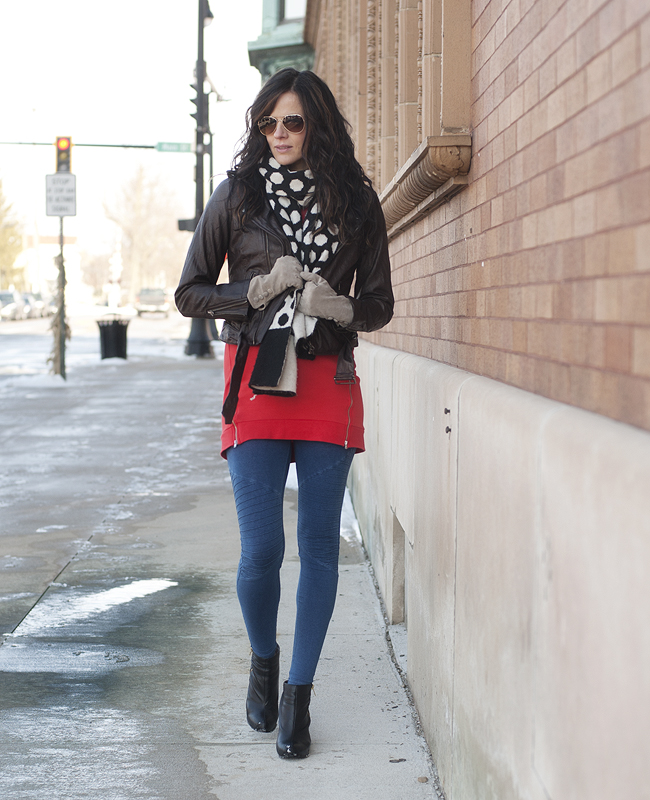
WEARING| sweatshirt similar/moto jeggings similar/moto jacket similar/polka dot scarf similar/black booties similar/aviator sunnies similar

brandyjsig


Posted in bump style, outfits, style | Tagged | 2 Comments

pretty plain janes etsy shop *now open*

Several months ago Shan and I discussed the possibility of PPJ opening an etsy shop.  Well today is the day and we could not be more excited to let this adventure begin!

I have been designing artwork for my home and events for a few years now.  It is something I have always enjoyed, finding so much of what I use in photography (like composition) carrying over to this form of art.  The most often asked question at parties would be how I did my signs.  So this is my first leap of faith at sharing this passion with the rest of you.  Starting off with modern and fun printables for your home!  All prints are instant downloads – simply print on your own printer or take to your favorite print shop.  And in celebration of opening day we are offering 10% off with the CODE 011714 (ends at midnight tonight)!  Here is a little sampling of what you will find in our shop:

printablesThis is just the beginning with big plans of adding more artwork very soon as well as printables for events such as birthday parties.  So please check the PPJ SHOP often because you never know what we may be up to!

Have a fabulous weekend everyone!

brandyjsig


Posted in etsy shop | Tagged | 6 Comments

spanish chickpea and spinach stew with ginger

chickpea_spinach_ginger_soup_1By now you’ve made your fall/winter go to soups several times.  All delicious and comforting and I am sure your family’s favorites.  Come January though you may be looking for something a little different.  This would be your something different.  Several years ago I made this recipe during a soup rut.  The ginger and smoked paprika make the tomato broth dance on your taste buds.  While the chickpeas are buttery and satisfying.  There’s extra bonus points here for being healthy and vegan as well.  I promise you will love this.  (Unless you do not like ginger, in that case look away and move on.)

chickpea_spinach_ginger_soup_2If you are not already storing big ugly pieces of ginger root in your freezer you should be.  And if you have yet to purchase smoked paprika you should immediately do that as well.

chickpea_spinach_ginger_soup_3There is a little “fuss” in this recipe, hence the spinning mini food processor.  I swear it’s worth it though.

chickpea_spinach_ginger_soup_4The original recipe has the onion and garlic thinly sliced.  I stuck with the sliced onions but went with a mince on the garlic.  While I love the taste of garlic I am not sure I trust my knife skills enough to a. not cut myself while thinly slicing and b. slice thin enough to avoid that giant chunk of garlic that may creep into an otherwise delectable bite.

chickpea_spinach_ginger_soup_5It is important to saute your paprika with the onions and garlic.  Equally important to keep the garlic from turning brown.  Golden is fine but brown means bitter which is not what garlic wants to taste like.

chickpea_spinach_ginger_soup_6While simmering it is your choice how “stewy” you would like this to become.  This does thicken every minute that goes by.  Simply add more broth (1/2 cup at a time) if it has gotten too thick for your liking.

chickpea_spinach_ginger_soup_7We all have our things with one of mine being discolored overcooked spinach – not a fan.  I prefer mine a bright happy green with a little bit of bite.  In almost all soups that involve whole fresh spinach I fill my bowl with the leafy vegetable first and then ladle the steaming hot soup over.

chickpea_spinach_ginger_soup_8Gingery, smokey, buttery.  What’s not to love?  Shake up your normal soup routine and give this a try.  It may even become a regular on the line up.

brandyjsig


Spanish Chickpea and Spinach Stew with Ginger
 
Ingredients
  • 28 oz of whole frozen (thawed) or canned tomatoes
  • 1 1-inch knob ginger, peeled
  • ¼ cup extra-virgin olive oil (plus more for serving)
  • 1 medium onion, finely sliced
  • 4 cloves garlic, minced
  • 1 teaspoon sweet or hot smoked paprika
  • 1½ cups vegetable broth (may use chicken stock but this does change the vegan status)
  • 2 (14-ounce) cans garbanzo beans (chickpeas) drained and rinsed
  • 2 bay leaves
  • 2 teaspoons soy sauce
  • Kosher salt
  • 12 ounces fresh spinach
Instructions
  1. Drain tomatoes in a metal strainer set over a medium bowl. Transfer liquid and half of tomatoes to a blender along with ginger. Blend on high speed until completely pureed. Set aside. Roughly chop remaining peeled tomatoes and set aside separately.
  2. Heat olive oil in a large pot over high heat until shimmering. Add onion, garlic, and paprika, and cook, stirring frequently, until softened and very slightly browned. Add tomato-ginger puree (it should immediately start simmering) and stir to combine.
  3. Add broth, chopped tomatoes, garbanzo beans, bay leaves, and soy sauce, and bring to a boil over high heat. Reduce to a bare simmer and cook, stirring occasionally, until thickened into a thick stew, about 30 minutes total. Add more broth if it becomes too thick. Season to taste with kosher salt.
  4. Place a handful of spinach into bowl and ladle hot soup on top. Drizzle with extra virgin olive oil if desired.
Nutrition Information
Serving size: serves 2 with leftovers

recipe adapted from seriouseats.com

Posted in recipes, what's cooking | Tagged | 2 Comments

baked fruit oatmeal

Here lately I’m all about breakfasts that feed the masses.  It may be the fact that our normal table of three has doubled to six, with my sister-in-law and two neices visiting for a bit, so the more food to go around the merrier. After our baked french toast post, I have become more and more intrigued by these fun breakfast options and have been searching for more make-ahead recipes.  This baked oatmeal is easy and healthy, so no New Years resolutions need to be sacrificed to enjoy.

berry_oatmeal_bake_1
There is also something awesome about having breakfast ready to throw in the oven, no effort required, first thing in the morning (because if you are anything like me, very little productivity takes place in those early hours.)

For this recipe I used bananas and strawberries, but you can use any fruit you prefer in your oatmeal!

berry_oatmeal_bake_2

Begin by slicing your strawberries and bananas and setting them aside.  Then, mix your dry ingredients; the oats, walnuts, baking powder and cinnamon.  In a seperate bowl, whisk together the maple syrup, eggs, milk and vanilla.

berry_oatmeal_bake_3

Prep your 9×13 baking dish by coating it with a light layer of butter.  (*Note- I accidently used a smaller dish and had to scoop out some before baking.  Oops!) Then,  layer half of your banana’s and strawberries in the bottom of your dish. Go ahead and eat a few- it’s okay.

berry_oatmeal_bake_4
Next, evenly spread the dry ingredients over the sliced berries.

berry_oatmeal_bake_5
Pour the wet ingredients evenly over the oats…
berry_oatmeal_bake_6
Finish by layering the remaining fruit over the top, and sprinkle a bit of cinnamon over it.
berry_oatmeal_bake_7
If you are making this the night before, go ahead and cover your dish for the refridgerator- if not it is ready for the oven!
Bake at 375F for 35-40 minutes, and serve drizzled with maple syrup if desired.
berry_oatmeal_bake_8

fruit baked oatmeal
 
Ingredients
  • 3 cups old fashioned oats
  • ¾ cup walnut pieces, toasted and chopped
  • 3 ounces maple syrup
  • 1½ teaspoons baking powder
  • 2 teaspoons cinnamon, plus more for sprinkling on top
  • 3 cups milk (I used 2 cups regular and 1 cup almond)
  • 2 eggs
  • 3 tablespoons melted butter
  • 1 tablespoon vanilla
  • 3 bananas, sliced
  • 12 ounces fresh strawberries
Instructions
  1. Preheat the oven to 375 degrees. Chop and toast your walnuts, until fragrant. Butter the inside of a 9 x 13-inch baking pan.
  2. In a bowl, mix together the oats, walnuts, baking powder and cinnamon.
  3. In another bowl, whisk together the maple syrup, milk, eggs, and vanilla. Add the melted butter and whisk to combine.
  4. Arrange the bananas & strawberries in a single layer at the bottom of the baking dish. Cover the fruit with the oat mixture. Slowly pour the milk mixture over the oats. Layer the remaining fruit on the top and sprinkle with cinnamon.
  5. Bake for 35-40 minutes, until the top is golden and the oat mixture has set. Let cool slightly before serving. Drizzle with maple syrup and enjoy!

berry_oatmeal_bake_9
Start your day with something yummy!
shansig

Posted in recipes, something sweet | Tagged | 3 Comments

makeup for small eyes

Meet Hannah, my gorgeous sister-in-law who has been in Ohio visiting for a bit.  In this wintery weather, we have not been out much- but I had the chance to dress her eyes up a few times.  Many girls with smaller eyes feel like they can’t do much where shadow is concerned, but thats not necessarily the truth.  Figuring out where to put it, and how to enlarge your eyes is key.

To get started, you just need two brushes, a few basic naturals, and one really dark shade, such as black.

small_eyes_1
(Pictured is Urban Decay’s Naked 3 palette, that I love, and MAC’s “carbon”, a great matte black.  Angled brush similar here. )

small_eyes_2a

1. To begin, prep your lid with primer, and cover your entire lid with the lightest shade, concentrating it on the innermost corner.

2. Using a medium/light brown shade, follow the natural crease of your lid.

3. Using an angled brush, and your darkest shade (black for Hannah), trace and accentuate the lid.  (For a day-to-day look- stop here! Add mascara and you have a natural day look!)

4. If you want to take your look a bit darker, continue the black shade line a bit further out.

5. Using your crease line that you accentuated in step 2, fill the outter corner of your eye with your dark shade, working in light, sweeping motions.

6. Use a light brown to darken the entire lid a bit, and use angled brush to trace lower lid as well.

Small eyes just mean that you need to find a shape that works for you, not that you can’t have fun with shadow!

shansig


Posted in beauty, makeup | Tagged | Leave a comment