candied grapefruit cocktail

  candied_grapefruit_cocktail_0Birds are chirping, trees are budding and droves of people are coming out of their winter habitats for some good ol’ Vitamin D.  Welcome Spring!  Wait, we live in Ohio and it has snowed twice since the supposed Spring debut.  Fabulous.  What’s a gal to do?  Make a light and refreshing cocktail of course.  If we can’t join all of you lucky warm weather dwellers we might as well cheers you!

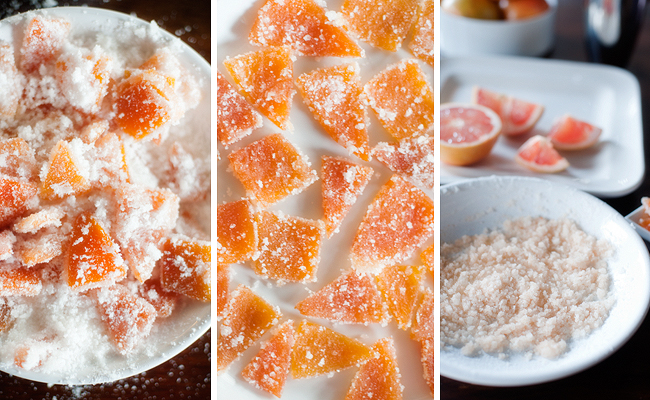
To enjoy the full experience of this concoction you need to make the candied grapefruit.  If you need a drink like now, we’ll forgive you for skipping this part.

candied_grapefruit_cocktail_1candied_grapefruit_cocktail_2

Candied Grapefruit
 
Ingredients
  • 2 large pink grapefruits
  • 5 cups of sugar (1 cup separated)
  • water
Instructions
  1. Cut the grapefruits into 4 wedges. Remove the peel from each wedge (save wedge for juice in the cocktail recipe). Youʼll have 8 grapefruit peels. Cut them into chunks or long strands… whatever you prefer. Place them over a stove top in a boiling pot with about 1 inch of water covering them. When the water starts to boil, remove the pot from the heat, strain the grapefruit peels and then place them back into the pot with fresh water and boil again. Repeat this step 4 times. This is because grapefruit peels are very bitter and you want to get rid of the bitter water as soon as possible. It sounds daunting but we assure you it is not.
  2. After youʼve boiled them for the 4th time strain and set aside. In the pot, add 4 cups water and 4 cups sugar. Stir until sugar and water are combined, then add the grapefruit peels back in. Boil the mixture over high heat for about 30 to 40 minutes, stirring occasionally until there are large opaque bubbles and the grapefruit peels are completely translucent. Strain the mixture over a heat proof bowl so you can keep the simple syrup for a different cocktail if you want!
  3. Place 1 cup sugar in a bowl and add in the hot grapefruit peels. Mix them in the sugar (the peels are hot be sure to use a spoon) so theyʼre completely covered. Wipe off excess sugar then set on a plate to cool. Save leftover sugar for rimming your glasses. These package up nicely as little treats for guests but their true mission in life is to garnish this wonderful cocktail.

recipe from Rock UR Partycandied_grapefruit_cocktail_3

Candied Grapefruit Cocktail
 
Ingredients
  • 1 ounce gin
  • 4 ounces freshly squeezed grapefruit juice
  • 1 teaspoon agave nectar
  • 2 candied grapefruit peels
  • dash of cayenne, depending on how spicy you like it (optional*)
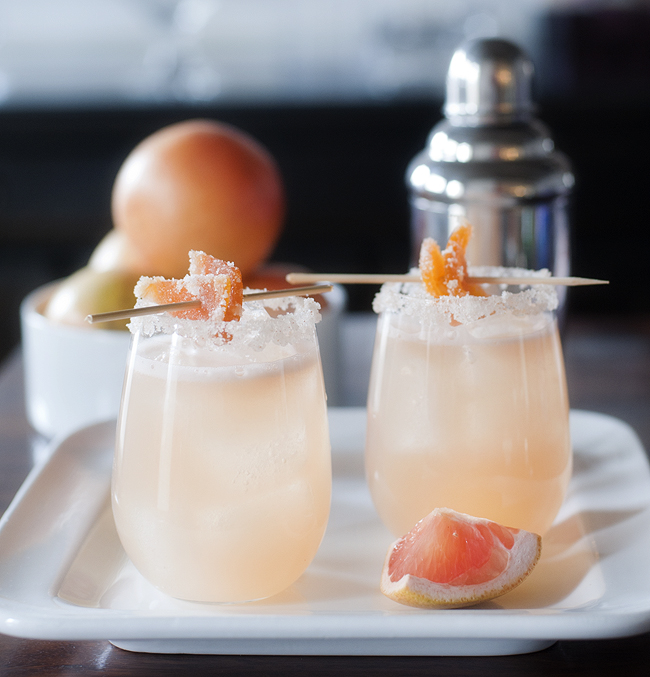
  • grapefruit wedge and sugar for rimming (optional*)
Instructions
  1. *Mix cayenne and sugar, rim glass with a grapefruit piece then dip in sugar mixture before filling with ice. The touch of cayenne compliments the gin nicely.
  2. In a cocktail shaker, add ice, grapefruit juice, agave and gin. Shake several times. Pour over a 4oz glass filled with ice. Slide two candied grapefruit peels onto a wooden skewer (cut in half) and place on the rim of the glass. Now be prepared to taste one of the best drinks you have ever had!

recipe adapted from Tablespooncandied_grapefruit_cocktail_4 candied_grapefruit_cocktail_5 candied_grapefruit_cocktail_6Gin has not always been at the top of our drink choice list but this amazingly not too sweet taste of Spring has made us change our ways.  You have to try this, you just have to!  It will without a doubt chase away the stink eye you’re giving this so called lovely weather (if you live somewhere that is having a legit Spring, we don’t want to hear about it – at least not until we’ve had our cocktail).

Cheers!

Posted in cheers! | Tagged | 15 Comments

diy glam throw pillows

freezer_paper_stencil_pillows_1

We live in a very old house. Oh, I mean historical house. This classic, farm house lady gets very upset when I refer to her as old. She’s well over 110, has truly great bones, a dreamy wrap around porch, and plenty of character. I really try my best to outfit her inside to match her timeless outside. This means lots of tufted furniture, relic style pieces, and the right amount of glam. Our office sofa has recently been glaring at me each and every time I walked by. I can’t blame her. She’s a gorgeous shade of gray, soft and velvety, and has been waiting for some accessory throw pillows for far too long. I pictured something with a bit of sparkle, but justifying to my husband spending anything more than $10.00 on a pillow, would do nothing but cause a pillow fight. Simple home style DIY to the rescue.

freezer_paper_stencil_pillows_2

You will need:

  • Plain throw pillow cases in the size and color of your choice. (I found the best prices and selection on Etsy, but they are sold at some home craft stores as well)
  • Freezer paper. Sold at any grocery store
  • Fabric Paint. (I used Tulip brand, sold at any craft store)
  • Warm iron, no steam
  • Scissors
  • A printed image of your choice for your pillow.

freezer_paper_stencil_pillows_3

Steps:

  1. Iron your cases so you have a nice flat surface to paint.
  2. Take your freezer paper, (gloss side down), and trace the printed image for your case.
  3. Cut out your image, preserving the outline. Remember, it is the outline that you are using as your stencil.
  4. Iron on your freezer paper, (gloss side DOWN), in the placement you have chosen. Do not use the steam feature. Lay all stencils out first if you are using more than one. I always iron on my large cutting board for a nice hard surface. Make sure to press down any small edges for a good seal.
  5. Paint! Don’t go heavy on your paint. If a second layer is needed, wait until the first sets up a bit.
  6. Peal your freezer paper off. This is the best part! I suggest pulling freezer paper off before your paint has fully dried, to achieve a clean edge.
  7. Let dry. Or blast it with a bit of cool air from your hair dryer.

Voila! This is the moment I always feel like Becky Homecky, and I can craft anything. I chose metallic paint for my pillows for a bit of shine, but be creative here! Select shades that will complement your space. At the end, I used some bead paint for a little extra embellishment. I prefer painting with sponges because they are easier on the paper edges, and really get in all the tiny spaces if you are painting something more intricate. Between the metallic paint, and the pretty patterns, I think my sofa has forgiven me for ignoring her. And I must say, she looks super stylish in her new glam.

freezer_paper_stencil_pillows_4

This simple technique allows you to create exactly what you are looking for and define your home style all on your own. Finding what feels the most you is the most fun in a home decor journey. When you have created something you take pride in, it becomes such a reflection of your style, and your room will start to feel like bits and pieces of yourself. But that’s just pillow talk. ;o)

freezer_paper_stencil_pillows_5

lisasig

Posted in abode, diy | Tagged | 1 Comment

the best chocolate chip muffins

chocolate_chip_muffins_3

I get so caught up in my constant cookie baking that I usually steer clear of chocolate chips when I get the urge to whip up something new.  On this particular morning however, I had chocolate on the brain- and muffins.   Who doesn’t love a good muffin?  It’s like eating dessert for breakfast, only you don’t feel quite as guilty about it.  A double berry recipe that I have had for a few years still holds its number one spot as my favorite muffin- but these definitely gave them a run for their money.  They are moist and sweet- and the crunchy top makes the texture spot on.  And those pretty green liners? Well, it was St Pattys Day after all!

chocolate_chip_muffins_2

The Best Chocolate Chip Muffins

Ingredients:
2 cups AP flour
1/2 cup sugar
3 tsp baking powder
3/4 tsp salt
1 1/4 cups milk chocolate chips
1 egg, beaten
3/4 cup milk
1/2 cup vegetable oil

Topping:

3 tbsp sugar
2 tbsp brown sugar

Preheat oven to 400F.  Fill muffin tin with 12 pretty liners. In a medium size bowl combine the flour, sugar, baking powder, salt, and chocolate chips. In a separate bowl, combine the beaten egg, milk, and vegetable oil.  Add the wet ingredients to the dry ingredients and mix until just incorporated. Remember, do not overmix!! Divide batter evenly among the 12 liners (I prefer to use this fabulous cookie scoop– its the perfect size for large cookies, cupcake and muffin batter!!)

Combine the sugars to make the topping, and sprinkle evenly before baking.  Bake at 400 for 20-23 minutes.

chocolate_chip_muffins_1

Sweetly,

shansig

Posted in something sweet | Tagged | 3 Comments

styling tools…

I am often asked what my favorite styling tools are. A girl should always have a fabulous flat iron for those straight hair days and for those flat iron curls everyone is dying to know how to do, and the perfect curling iron. I am a firm believer in, you get what you pay for. Heading to the store to pick up just any old iron won’t do the job. Some are fine and will do the job for a while, but they tend to not last and fail to get hot enough, or ouch… too hot! I say take the leap and purchase a great quality iron. I promise, you won’t be disappointed.

I started using the ghd flat iron about 8 or 9 months ago and I couldn’t believe the difference. Sleek, straightening results and easy peasy curls or waves.

264_image_1_hero

124_Image_1_USA_HeroAvailable in salons or online| ghdghd-logo

I have to admit I LOVE my curling iron. I mean, love… LOVE!! A lot of stylist really do not use them much anymore. It seems the flat iron has swept the hair nation and taken over. Not in my book, there will always be a place in my heart for the curling iron. Whether I am curling hair in a traditional way or wrapping the hair around the iron, I always reach for my Hot Tools. I think every girl should own a great curling iron! Hot Tools are a girls best friend. They will not disappoint and are perfect for any size of curl, whether you are wanting soft waves or 80’s big hair curls, Hot Tools has the curling iron for you.

hot-tools-professional-spring-curling-iron-416x416hot-tools-nano-ceramic-curling-iron-416x416

Available in salons or online| Hot Tools

logo_hot_tools_Professionals

A professional flat iron and curling iron is worth the investment. Hot Tools and ghd are my two favorite professional curling iron and flat-iron brand recommendations. Having a great iron will guarantee great hair.

8389051_600x338

Like Truvy (Dolly Parton) says…, “There is no such thing as natural beauty.” -Steel Magnolia’s

Pink-Heart

jordannesig

Posted in beauty, product love | Leave a comment

her style | ashley

her_style_ashley_1We had the pleasure of visiting my beautiful cousin Ashley yesterday for her son’s belated one year photo session!  Knowing she would have her closet spring ready I of course had to sneak in a few images of this stylish mom.  While perusing her wardrobe I spied a few new pieces from Target.  Ash filled me in on how she enjoys spending lunch breaks at the BEST STORE EVER and obviously makes smart fashion choices.  I particularly fell in love with this lovely floral top and graphic stripe cardigan.  The mix of the pattern is unexpected and the bright yet rich colors compliment her skin tone so well.  Better yet she can wear this now, while the chill is still on for us northerners.  Always an admirer of her fun, preppy and colorful style – this look is one of my Ashley favorites!her_style_ashley_3Her lil guy Auggie was rocking the stripes as well.  Couldn’t resist throwing him in for a couple with mommy!her_style_ashley_4 her_style_ashley_5|WEARING| Ashley striped sweater similar/Merona floral blouse/Old Navy skinny jeans/DV by Dolce Vita pink pumps/leopard earrings similar/bracelets similar  Auggie Carters stripe sweater/H&M denim shirt/trousers similar/green shoes similar

brandyjsig

Posted in outfits | 1 Comment