oat and banana baby bites

Finding healthy snacks for toddlers is not always an easy task.  This recipe is quick, easy and best of all- a blank canvas!  Nuts, dried berries, dark chocolate- you could throw just about anything into these tasty little cookies!

kidcookies_5

Oat & Banana Baby Bites

1 cup whole wheat flour
1 cup quick oats
1 tsp baking powder
1/2 tsp cinnamon
1/4 tsp fresh ground nutmeg
1/4 tsp salt
2 over-ripe bananas
3 tbsp melted coconut oil
2 tsp honey  (Note that babies under 12 months are not recommended to have honey)
1 tsp pure vanilla extract
Hand full of dried blueberries

kidcookies_2

Instructions:

Preheat oven to 350F

In large bowl, mix together flour, oats, baking powder, salt & spices.  In another bowl, mix melted coconut oil, honey, mashed bananas and vanilla.  Combine the two, and then add any dried fruit or nuts of your choice.

Drop 1 inch balls onto parchment covered cookie sheets, and press lightly to flatten a bit.  Bake for 12-14 minutes.

kidcookies_3kidcookies_5a

There is nothing better than handing your toddler a cookie that you don’t have to feel guilty about.  Even my picky little eater loves these!

Happy baking,

shansig

Posted in Kids, something sweet | 2 Comments

prime time

I am often asked how I get my eyeshadow to be so vibrant and last so long. The answer is actually quite simple. A must have in my cosmetic bag is Urban Decay Eyeshadow Primer Potion. This amazing product is even easy to apply. Just squeeze a small dab on your finger and smear over your entire eyelid. Continue with your eyeshadow as normal and you will see a difference immediately. If you are familiar with this amazing little tube you already know how amazing it is. If this is new to you, I promise you will love it.

primer_1

Eyeshadow primer, yes or no? Does it really make a difference? I promise you it definitely does. The primer grabs onto your eyeshadow and holds on for dear life, well, for at least 24 hours and won’t crease.

primer_2

*Pictured above is the same eyeshadow color, one with primer and one without. Now do you believe me?*

Urban Decay has four shades of eye primer potion. The Original dries invisible and is perfect for any shade of eyeshadow. The other three shades Eden, Sin and Greed are shades that can be worn alone, with eyeshadow, or as highlighters!

primer_3

1. Original, invisible finish, my favorite must have. 2. Sin, champagne shimmer, great worn alone or under eyeshadow to add a little extra bronze shimmer. 3. Eden, a nude and flat finish, is great worn alone for that naked eye look or perfect under eyeshadow for a flat finish. 4. Greed, gold shimmer, perfect worn alone for a hint of gold shimmer or under shadow to brighten them up.

Try one, or all four, you won’t be disappointed!

Pink-Heart

jordannesig

Posted in beauty | 1 Comment

diy inner ankle zip

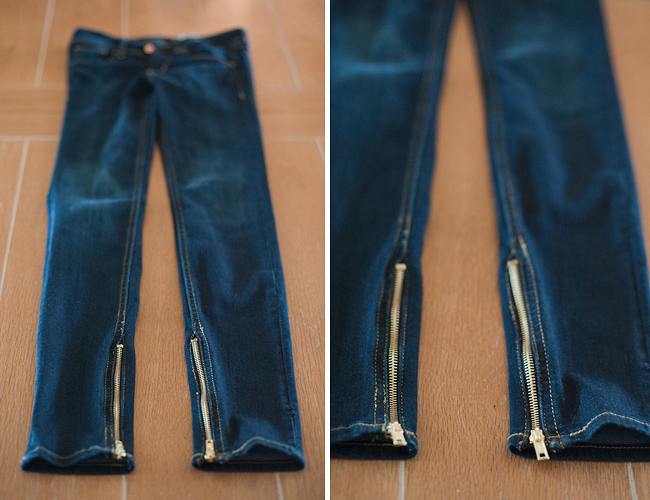
insideankle_1I have been lusting over inner ankle zip pants since last fall.  Problem is they are not as common as outer ankle zip which makes them even more difficult to find the right fit and price point.  It then hit me that sewing a zipper in the seam of a pant could be quite simple, and much to my satisfaction it was.insideankle_3You will need:

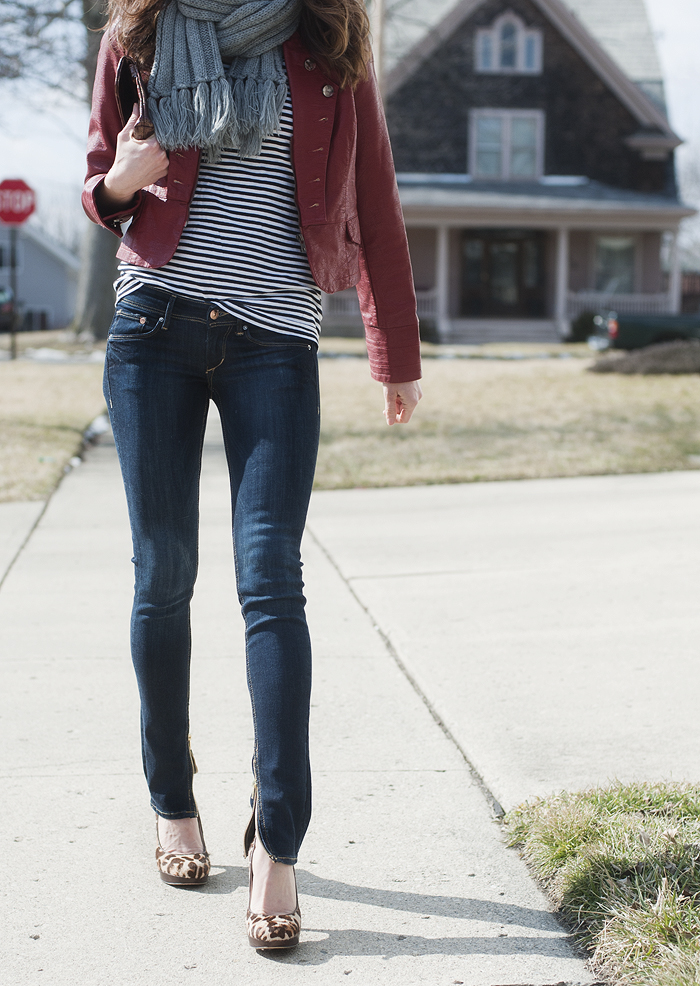
  • Pair of jeans you love (I opted for my favorite H&M super low skinnies and went with a longer length to achieve the “heel peeking out of the pant” effect)
  • 2 7″ zippers (found in most craft stores that carry sewing supplies)
  • Thread that matches the topstitch color of your pant
  • Seam ripper or snips and scissors
  • Sewing machine (I did not use a special zipper foot)

insideankle_4Steps:

  1. Remove seam from inside of each leg starting at the bottom and ending about a 1/2″ longer than zipper length.
  2. Turn pants inside out and remove seam from the outside of of each leg starting 1″ above bottom hem and 1″ longer than inside removal seam (this will will create an opening you can finish your sewing through).
  3. Turn pants right side out and re-topstitch the hem on the inside openings the came apart while taking out seam.
  4. Unzip ankle zipper and line bottom tooth up with topstitch of hem.  Sew halfway up, zip the zipper (basically getting the head of the zipper out of the way), sew rest of the way.
  5. Turn pants inside out.  Trough the seam opening you created sew from top of seam rip (still zipped) and then sew zipper as far as you can.
  6. Most jeans have a double topstitch on the inside legs.  Sew this topstitch starting from the top and as far as you can through seam opening allowance.
  7. Sew the outside seam opening shut.
  8. Turn pants right side out, unzip ankle zipper and finish sewing in the bottom of the zipper and topstitch line.
  9. Trim off the excess zipper fabric.

insideankle_5Have some fun with these by choosing zippers of different length or color.  If you are not much of a seamstress this would be an inexpensive alteration to have done by a professional.  I have hemmed pants before and quite honestly this is simpler.  So simple in fact I plan to do the same technique but down the front of the ankle – stay tuned!

Yesterday was my first outing in these bad boys and I absolutely love them.  They are everything I want in weekend wear – casual, cool and unique.  It’s the little details in a look that really define style, when you add your own it becomes even more gratifying and you.insideankle_2|WEARING| H&M jeans (with the DIY ankle zip)/faux leather red jacket similar/striped top similar/grey scarf similar/leopard pumps similar/bronze clutch similar

brandyjsig

Posted in diy, outfits | 1 Comment

loving lately

Brandy J:brandylovinglately1 Collecting delicate pendant necklaces for layering. Love the effortless look of it. (image source Fox On The Run) 2 Topping saltines with jam or peanut putter & dark chocolate. Perfect snacking bites! 3 My SUPER low-rise H&M jeans. I laughed when I bought them, thinking I would never wear. Surprisingly they have become my go-to denim and I now own two pair.

Shan:shanlovinglately1 Caribou Obsidian. A change up from my usual Dark Magic. If you love bold coffee, this is YUM. 2 Painted baby piggies. Vacation calls for pretty toes for everyone! 3 Retro inspired suits. Obsessed with how classy yet fun and youthful these suits are! (Suit pictured is Anthropologie)

Jordanne:jordanneloveinglately

1 Loving all things Tortoise. BAUBLEBAR has some amazing pieces. 2 M.A.C., Mineralize Skinfinish Powder in Soft and Gentle, adds that extra little pizazz to your foundation. I cannot get enough of the metallic finish. 3 My husband and I recently saw the Avett Brother’s in concert and Jill Andrews started the night out with an amazing show. She is definitely worth checking out.

Posted in personal, pretties, product love | Leave a comment

easy homemade marinara

“Mmmm…it smells soooooo good in here.” A familiar line when a person enters our home while marinara is simmering away on the stove. I began making my own over a decade ago and have not purchased a jar of store bought since. Marinara at home is so simple and versatile. It freezes beautifully, makes a wonderful gift and can be used in more recipes than I could ever list. The best part is that it never tastes quite the same as the last batch but it always tastes good, no matter what. This is a fool proof wow recipe that will forever remain in my cooking arsenal.

marinara_4marinara_1Most ingredients can be found in your pantry, making this easy to whip up in a pinch. Any non-sweet red wine you enjoy drinking will do. If cooking wine still exists do not make this recipe with it, or any other recipe for that matter. Feel free to purchase the fancy schmancy canned tomatoes, store brand is more than acceptable though. If you are like us and grow maters in the summer it’s definitely worth your time to freeze some of your harvest. Nothing like homegrown tomatoes for a batch of marinara in the dead of winter.marinara_2

Easy Homemade Marinara (yields almost 8 cups)

  • 2 tablespoons extra-virgin olive oil
  • 1 medium red onion diced
  • 4 cloves minced garlic (we like garlic, omit 1 or 2 cloves if you are not a big fan)
  • 1/2 teaspoon crushed red pepper flake
  • optional 1 teaspoon of dried oregano or Italian blend herbs
  • 1/2 to 3/4 cup of red wine (amount used depends on intensity of flavor you prefer)
  • 2 28oz cans of whole tomatoes in their juice roughly chopped with kitchen shears
  • Salt and pepper to taste
  • Handful of chopped fresh herbs such as parsley or basil

Instructions Heat the oil in a large saucepan over medium-high heat. Add onion and cook until almost translucent. Add the garlic and red pepper flake, cook for another 2-3 minutes until onions are translucent. Add wine, bring to a simmer and reduce to at least half it’s consistency. Once wine is reduced and onions are a deep burgundy color add the tomatoes, salt & pepper and optional dried herbs. Simmer for at least 15 minutes before adding fresh herbs.

Marinara can be used immediately, kept in the refrigerator for up to 3 days or froze for up to 2 months. Throw in a food processor and pulse into a smoother consistency that would be great for dipping or pizza sauce. In our home, more times than not, it is used for a just as simple spinach lasagna with only a few additional ingredients.marinara_5Simple Spinach Lasagna (yields 8 servings)

  • 2 tablespoons of extra-virgin olive oil
  • One batch of Easy Marinara Sauce
  • 1lb package of dried lasagna noodles (I need 18 noodles for my dish)
  • 2 cups of ricotta cheese
  • 15 ounces of fresh spinach
  • 1 1/2 cups of shredded mozzarella cheesemarinara_6

Instructions Preheat oven 350F. Drizzle olive oil in bottom of preferred lasagna dish. Place one layer of dried lasagna noodles in dish (I do not cook my noodles in advance, nor use oven ready. The sauce and spinach have enough moisture in them to cook the noodles while in the oven.). Spread half the ricotta on top followed by half the spinach. Top with a few ladles of marinara. Repeat this process, starting from the noodle layer, once more. Place final layer of noodles on top and pour remaining marinara sauce over them. Cover with shredded mozzarella cheese being sure to go from edge to edge (this will help ensure your pasta edges stay moist and not turn hard while baking). Lightly cover with foil and place in oven for 55 minutes. Remove foil and bake for another 10 minutes or until cheese is golden brown. Allow to set for 10 minutes before serving.marinara_3This dish is very close to my heart and something my family enjoys often. I highly suggest serving with the same red wine you used to make the sauce. It will compliment the meal perfectly and give you something to cheers.


brandyjsig

Posted in healthy eats, recipes, vegetarian, what's cooking | 5 Comments