browned butter, pretzel & M&M cookies

Today’s recipe is  (drumroll please) a cookie. Cookies are truly my sweet spot, my comfort zone, my favorite of goodies in the baking world- and I couldn’t be more excited to feature one today!   I was eager and excited to create a cookie that wasn’t for my shop– one that was just for the readers.  When it comes to dessert I’m a salty/sweet girl, so these were a home-run for me.

easter_cookies_3

Browned Butter, Pretzel & M&M Cookies

2 sticks unsalted butter, browned (don’t know how to brown butter? that’s okay- I’ll show you!)

1/2 C brown sugar

1/2 C sugar

2 eggs (room temperature!)

1 tsp pure vanilla extract

2 1/3 C flour (all purpose)

1 tsp baking powder

1 tsp kosher salt  (regular salt works fine if you do not have kosher on hand!)

1 C M&M’s (or more, if you’re an M&M fanatic!)

1/2 C milk chocolate chips

1/2 C pretzels, broken

easter_cookies_2

Instructions:

Preheat oven to 350F and line baking sheets with parchment paper or silpat mat.

A few hours before beginning, brown your butter so that it has plenty of time to cool.  To brown butter, simply put both sticks of butter into a pan, place the heat on low, and get a whisk or spoon ready for stirring.  Once the butter is melted completely, stir frequently until the butter crisps in the bottom of the pan and starts turning a golden brown.  Be cautious- there is about a 30 second window to pour the butter into a bowl for cooling once the brown color appears before brown becomes black (eck!).  Be sure to use a spatula when removing the butter from the pan- and get all of the “chunks” on the bottom. That’s where the flavor is!! Browned butter has a deep, nutty aroma and is a useful trick for many recipes. Well worth the time and patience.  If you are browning your butter hours before you plan to use it, I usually let it sit at room temperature to return to its semi-solid state.  In a rush, you can throw it in the refrigerator.

easter_cookies_1

Once your butter is cooled and semi solid again, cream it together with both sugars.  Next, add your eggs (one at a time), followed by the vanilla extract.  In a seperate bowl, combine all dry ingredients (flour, baking soda and kosher salt).  Add dry ingredients to the wet and mix until just combined.  If you use a stand mixer be cautious of overmixing- it leads to sad, flat cookies.  Use a wooden spoon to stir in pretzel pieces, chips and M&M’s.

Scoop dough in one inch balls (I use this cookie scoop!) onto cookie sheet, bake 10-12 minutes.  Enjoy!

easter_cookies_4

shansig

Posted in something sweet | Tagged | 3 Comments

easy fun flirty curls

What girl doesn’t adore a fast recipe for fun, flirty hair?  This style works for nearly any length- and whats better, it doesn’t need to be perfect.  About 10 minutes with your curling iron and you’re all set!

flirty_curls_1

Before beginning be sure to blow dry your hair to give it extra volume, and apply any product that you like to use.  Our blow dry volume go-to is Big Sexy Hair Root Pump.  Spray at the roots, work into hair, and then blow dry while directing your hair against its natural direction.  Once your hair is completely dry, section if needed.

flirty_curls_2

Begin curling by wrapping one inch sections around the barrel of the iron- while it is flipped upside down.  The larger the section,  the larger the curls.  Work your way around your head taking a variety of different sized sections to make the curls flow more easily.  Touch up any straight ends as you go.  Short on time? You can cheat by simply adding a bit of curl to only the ends- no one will know!flirty_curls_3 flirty_curls_4Once the curls are complete, run your fingers through and mess it up a bit. (Yes, mess it up!).  Pull sections from your crown, hairspray and tease back to add volume.  Depending on your length and hair type, you can finish with a wax based product to add texture (our favorite is Kenra Texturizing Taffy) or shine, with a product such as Bumble and Bumble Let It Shine.flirty_curls_5flirty_curls_6Long or short, full or thin- add this easy style to your morning routine.  These curls will add some fabulous to your everyday look!

Posted in beauty, product love | 3 Comments

forcing spring

spring_transition_1 Packing for my weekend in Kalamazoo, MI I knew that I wanted to wear a “transitional” Spring look for our Saturday dinner plans.  Pleased with my choice I happily zipped my bag and off I went with an “I’m such a smart planner” grin.  Halfway there I took a peek at the weather forecast – yeah, should have done that sooner.  Being a tough girl I decided it was ok and that my fabulous ensemble would keep me plenty warm.  Upon arrival not only did I realize I forgot the clutch to finish my look but clean underpants as well (insert husband sigh here).  Needless to say the latter became priority and off to Target we went.  At least Mother Nature took pity on me and threw some toasty sunlight on my handbag-less photo shoot.  Of course it did not last long and I had no choice but to throw on my depressing black wool coat.  I was however the only person in the restaurant not wearing socks – told you I’m tough.spring_transition_2 spring_transition_3 spring_transition_4 spring_transition_5|WEARING| floral top similar/white blazer similar/H&M jeans/BCBGeneration nude pumps/black & gold bracelet similar/multicolored bracelet similar

brandyjsig

Posted in outfits | Tagged | 5 Comments

candied grapefruit cocktail

  candied_grapefruit_cocktail_0Birds are chirping, trees are budding and droves of people are coming out of their winter habitats for some good ol’ Vitamin D.  Welcome Spring!  Wait, we live in Ohio and it has snowed twice since the supposed Spring debut.  Fabulous.  What’s a gal to do?  Make a light and refreshing cocktail of course.  If we can’t join all of you lucky warm weather dwellers we might as well cheers you!

To enjoy the full experience of this concoction you need to make the candied grapefruit.  If you need a drink like now, we’ll forgive you for skipping this part.

candied_grapefruit_cocktail_1candied_grapefruit_cocktail_2

Candied Grapefruit
 
Ingredients
  • 2 large pink grapefruits
  • 5 cups of sugar (1 cup separated)
  • water
Instructions
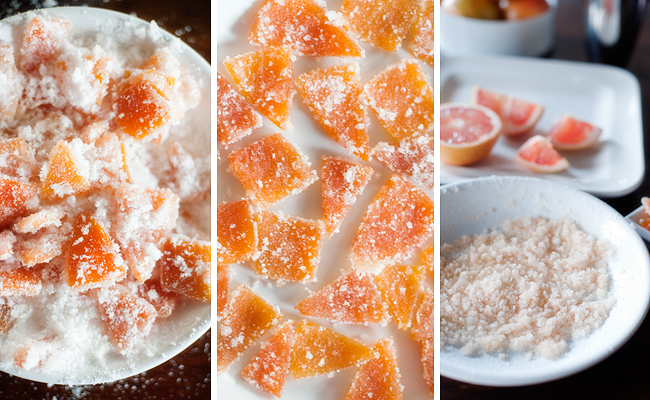
  1. Cut the grapefruits into 4 wedges. Remove the peel from each wedge (save wedge for juice in the cocktail recipe). Youʼll have 8 grapefruit peels. Cut them into chunks or long strands… whatever you prefer. Place them over a stove top in a boiling pot with about 1 inch of water covering them. When the water starts to boil, remove the pot from the heat, strain the grapefruit peels and then place them back into the pot with fresh water and boil again. Repeat this step 4 times. This is because grapefruit peels are very bitter and you want to get rid of the bitter water as soon as possible. It sounds daunting but we assure you it is not.
  2. After youʼve boiled them for the 4th time strain and set aside. In the pot, add 4 cups water and 4 cups sugar. Stir until sugar and water are combined, then add the grapefruit peels back in. Boil the mixture over high heat for about 30 to 40 minutes, stirring occasionally until there are large opaque bubbles and the grapefruit peels are completely translucent. Strain the mixture over a heat proof bowl so you can keep the simple syrup for a different cocktail if you want!
  3. Place 1 cup sugar in a bowl and add in the hot grapefruit peels. Mix them in the sugar (the peels are hot be sure to use a spoon) so theyʼre completely covered. Wipe off excess sugar then set on a plate to cool. Save leftover sugar for rimming your glasses. These package up nicely as little treats for guests but their true mission in life is to garnish this wonderful cocktail.

recipe from Rock UR Partycandied_grapefruit_cocktail_3

Candied Grapefruit Cocktail
 
Ingredients
  • 1 ounce gin
  • 4 ounces freshly squeezed grapefruit juice
  • 1 teaspoon agave nectar
  • 2 candied grapefruit peels
  • dash of cayenne, depending on how spicy you like it (optional*)
  • grapefruit wedge and sugar for rimming (optional*)
Instructions
  1. *Mix cayenne and sugar, rim glass with a grapefruit piece then dip in sugar mixture before filling with ice. The touch of cayenne compliments the gin nicely.
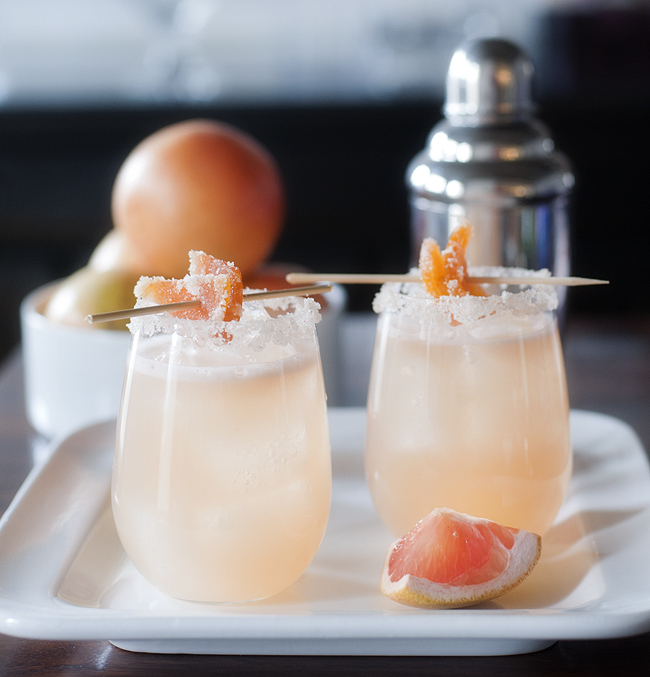
  2. In a cocktail shaker, add ice, grapefruit juice, agave and gin. Shake several times. Pour over a 4oz glass filled with ice. Slide two candied grapefruit peels onto a wooden skewer (cut in half) and place on the rim of the glass. Now be prepared to taste one of the best drinks you have ever had!

recipe adapted from Tablespooncandied_grapefruit_cocktail_4 candied_grapefruit_cocktail_5 candied_grapefruit_cocktail_6Gin has not always been at the top of our drink choice list but this amazingly not too sweet taste of Spring has made us change our ways.  You have to try this, you just have to!  It will without a doubt chase away the stink eye you’re giving this so called lovely weather (if you live somewhere that is having a legit Spring, we don’t want to hear about it – at least not until we’ve had our cocktail).

Cheers!

Posted in cheers! | Tagged | 15 Comments

diy glam throw pillows

freezer_paper_stencil_pillows_1

We live in a very old house. Oh, I mean historical house. This classic, farm house lady gets very upset when I refer to her as old. She’s well over 110, has truly great bones, a dreamy wrap around porch, and plenty of character. I really try my best to outfit her inside to match her timeless outside. This means lots of tufted furniture, relic style pieces, and the right amount of glam. Our office sofa has recently been glaring at me each and every time I walked by. I can’t blame her. She’s a gorgeous shade of gray, soft and velvety, and has been waiting for some accessory throw pillows for far too long. I pictured something with a bit of sparkle, but justifying to my husband spending anything more than $10.00 on a pillow, would do nothing but cause a pillow fight. Simple home style DIY to the rescue.

freezer_paper_stencil_pillows_2

You will need:

  • Plain throw pillow cases in the size and color of your choice. (I found the best prices and selection on Etsy, but they are sold at some home craft stores as well)
  • Freezer paper. Sold at any grocery store
  • Fabric Paint. (I used Tulip brand, sold at any craft store)
  • Warm iron, no steam
  • Scissors
  • A printed image of your choice for your pillow.

freezer_paper_stencil_pillows_3

Steps:

  1. Iron your cases so you have a nice flat surface to paint.
  2. Take your freezer paper, (gloss side down), and trace the printed image for your case.
  3. Cut out your image, preserving the outline. Remember, it is the outline that you are using as your stencil.
  4. Iron on your freezer paper, (gloss side DOWN), in the placement you have chosen. Do not use the steam feature. Lay all stencils out first if you are using more than one. I always iron on my large cutting board for a nice hard surface. Make sure to press down any small edges for a good seal.
  5. Paint! Don’t go heavy on your paint. If a second layer is needed, wait until the first sets up a bit.
  6. Peal your freezer paper off. This is the best part! I suggest pulling freezer paper off before your paint has fully dried, to achieve a clean edge.
  7. Let dry. Or blast it with a bit of cool air from your hair dryer.

Voila! This is the moment I always feel like Becky Homecky, and I can craft anything. I chose metallic paint for my pillows for a bit of shine, but be creative here! Select shades that will complement your space. At the end, I used some bead paint for a little extra embellishment. I prefer painting with sponges because they are easier on the paper edges, and really get in all the tiny spaces if you are painting something more intricate. Between the metallic paint, and the pretty patterns, I think my sofa has forgiven me for ignoring her. And I must say, she looks super stylish in her new glam.

freezer_paper_stencil_pillows_4

This simple technique allows you to create exactly what you are looking for and define your home style all on your own. Finding what feels the most you is the most fun in a home decor journey. When you have created something you take pride in, it becomes such a reflection of your style, and your room will start to feel like bits and pieces of yourself. But that’s just pillow talk. ;o)

freezer_paper_stencil_pillows_5

lisasig

Posted in abode, diy | Tagged | 1 Comment