cracked potatoes (crash hot potatoes)

crash_hot_potatoes_3
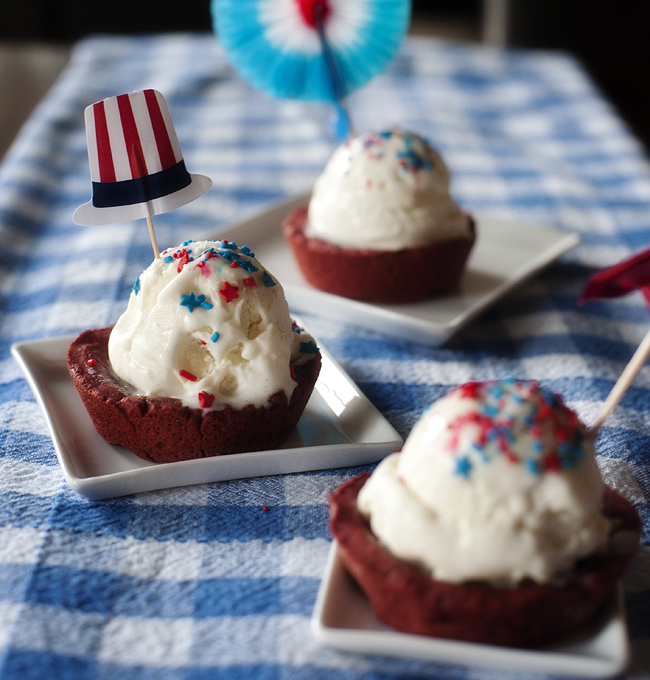
Potatoes, let’s face it, not so fabulous on their own but the options of making them into something fabulous are unlimited.  They are also inexpensive and very filling, what’s not to love about that?  In a hurry we of course do the stand by of oven fries, home fries or simply baked.  When there’s time though this has become our favorite way of eating them.  It requires boiling and baking but I promise you it is worth all the trouble.

crash_hot_potatoes_5This recipe is from the one and only Pioneer Woman (Crash Hot Potatoes).  Ladies, if you want to please your man’s belly she is your best girlfriend.

crash_hot_potatoes_6 crash_hot_potatoes_4

Cracked Potatoes
 
Ingredients
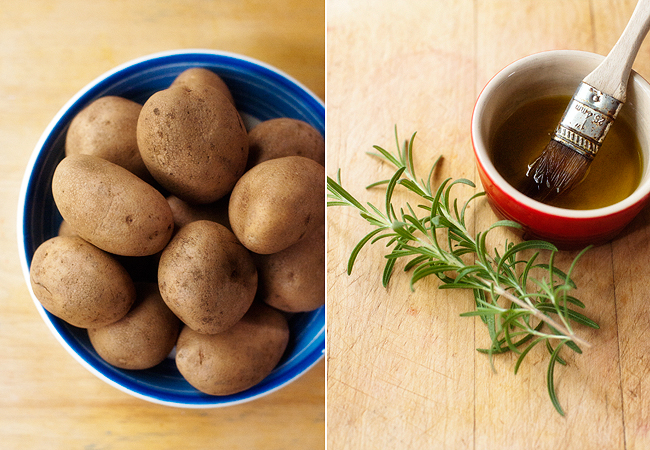
  • 12 Whole Small Potatoes (we used regular idaho which works good but new potatoes are even better)
  • 3 Tablespoons Olive Oil
  • Kosher Salt To Taste
  • Black Pepper To Taste
  • Rosemary (or Other Herbs Of Choice) To Taste
Instructions
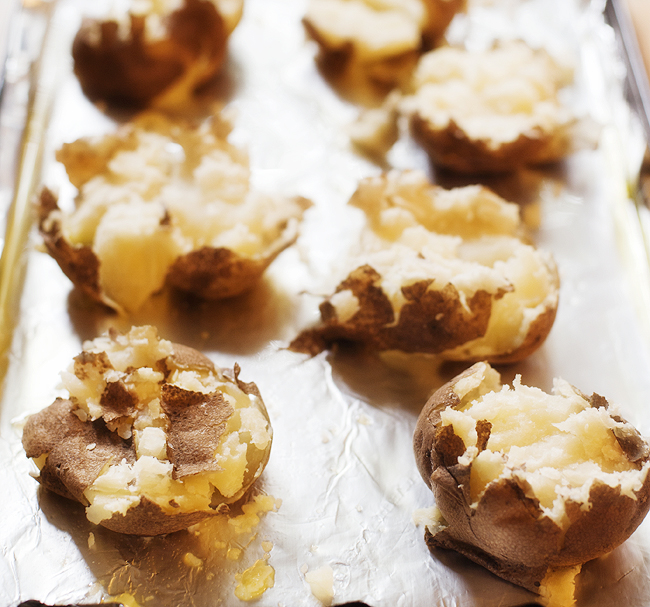
  1. Bring a pot of salted water to a boil. Add in as many potatoes as you wish to make and cook them until they are fork-tender. Mine took between 20-25 minutes.
  2. On a sheet pan, generously drizzle olive oil. Place tender potatoes on the cookie sheet leaving plenty of room between each potato.
  3. With a potato masher, gently press down each potato until it slightly mashes (be careful not to press all the way down), rotate the potato masher 90 degrees and mash again. Brush the tops of each crushed potato generously with more olive oil. If potato has fallen apart a bit you can simply form it back together.
  4. Sprinkle potatoes with kosher salt, fresh ground black pepper and fresh chopped rosemary (or chives or thyme or whatever herb you have available). Don’t be stingy, the seasoning really makes them special.
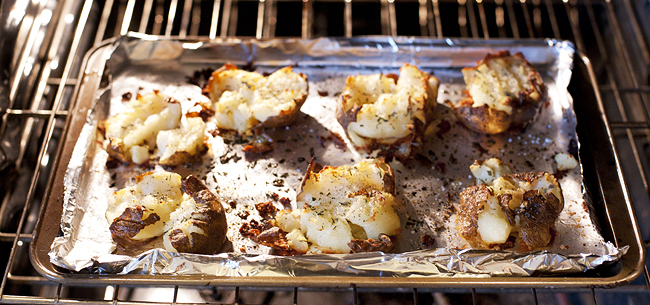
  5. Bake in a 450 degree oven for 20-25 minutes until golden brown.
Nutrition Information
Serving size: 4

crash_hot_potatoes_1

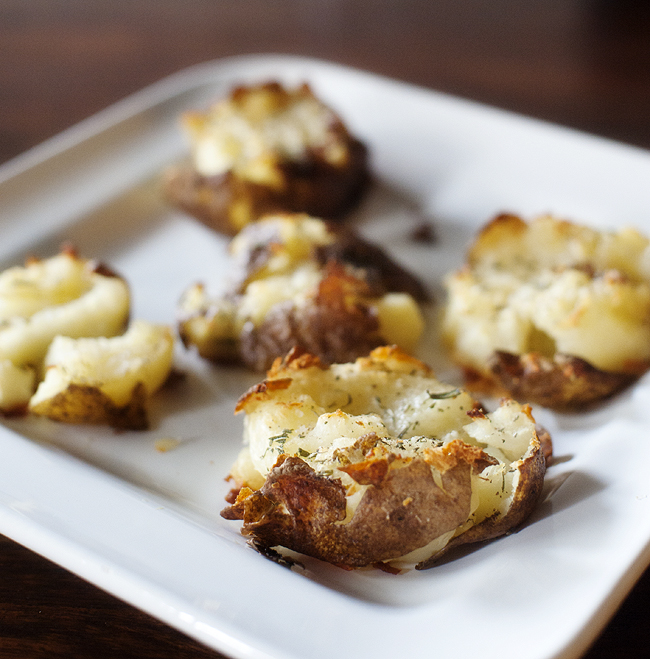
These are velvety, crunchy and just oh so good.  You could top these with your preferred potato companion (cheese, bacon, sour cream).  I am a ketchup fanatic, to the point of grossing people out, but since my husband had left over barbecue sauce (Sweet Baby Ray’s to be precise) I opted for a little kick with mine.  Try these the next time you’re staring at your bag of potatoes wondering what to do.  You’ll thank me later.

brandyjsig


Posted in recipes, what's cooking | Tagged | 1 Comment

grilled barbecued chicken wings

grilled_barbecued_chicken_wings_1This may make me the strangest non-meat eater ever but I truly enjoy preparing and cooking carnivorous dishes for my husband.  First of all, he rarely gets to enjoy meat which admittedly leaves me feeling a tad guilty (although I have never heard him complain).  Second of all, I find satisfaction in cooking for others and want to be able to please all.  Barbecue chicken is something that I ate and loved back in my meat eating days, so when my husband began asking me for some a few years back I happily went searching for a great recipe.  Sticky now helps me with this entire dish (can almost make it on his own) – a true tell sign that this barbecue chicken is legit.

grilled_barbecued_chicken_wings_4

Grilled Barbecued Chicken Wings
 
Ingredients
  • 2 quarts water
  • 2 tablespoons kosher salt
  • ¼ cup brown sugar
  • 2 garlic cloves, smashed with the side of a large knife
  • 24 chicken wings
  • olive oil
  • 2 cups of your favorite barbecue sauce (no I do not make my own, sorry Tyler)
Instructions
  1. For the brine, in a mixing bowl combine the water, salt, sugar and garlic. Transfer the brine to a 2-gallon sized re-sealable plastic bag. Add the chicken, close the bag and refrigerate 2 hours (if you’ve only got 15 minutes, that’s fine) to allow the brine to penetrate the chicken. This step is very important and the reason I believe this chicken is so moist.
  2. Preheat oven 375 degrees F.
  3. Preheat a grill pan or an outdoor gas or charcoal barbecue to a medium heat. Take a few paper towels and fold them several times to make a thick square. Blot a small amount of oil on the paper towel and carefully and quickly wipe the hot grates of the grill to make a nonstick surface. Take the chicken out of the brine, pat it dry on paper towels. Arrange the chicken pieces on the preheated grill and cook 5 minutes on each side. Transfer the grill marked chicken to a cookie sheet and then place in the oven. Cook the chicken for 5 minutes, remove it from the oven and then brush liberally, coating every inch of the legs with the barbecue sauce and then return to the oven for 10 to 15 more minutes, basting the chicken for a second time half way through remaining cooking time. Serve with extra sauce.
Recipe adapted from Tyler Florence – usually I use the legs and thighs as suggested, just happened to have wings this time.
grilled_barbecued_chicken_wings_2We have served this to both of our immediate families (the leg and thigh version) and almost instantly phrases like “wow, this is good”, “can’t believe how moist this is”, “who knew Brandy could make barbecue chicken” ensue.  For a dish I have never taste tested myself it completely satisfies the people pleaser in me.  Give it a try the next time you fire up the grill!

brandyjsig


Posted in recipes, what's cooking | Tagged | Leave a comment

red velvet cookie bowls

ice_cream_red_velvet_cup_for_4th_of_july_4

I’m a “from-scratch” girl.  If something needs lemon juice, you can bet I am squeezing real lemons and not pouring it from a bottle.  Pancake mix?  Those “shake and pour” bottles are an overpriced waste of time if you ask me.  So many things are just as easily made at home for a fraction of the price, minimal effort and result in a better tasting product.  (Not to mention the sense of accomplishment you get when you figure out that you don’t need a pre-made mix!)  There are few things I dislike more than seeing an image for what looks like a really promising recipe, reading through the ingredient list and finding a box of cake mix of some sort on it.  And I know- there are people who do not consider using one cheating, but my stubborn mind cringes when I read it.  I have been on the hunt for a good cookie cup or cookie bowl recipe and have not come across any recipes that don’t call for one.  Can you believe that?  Ridiculous.  Okay, you get it, I dislike cake mix.

These red velvet cookie bowls took some experimenting, but I could not have been more pleased with the end result.  They are so festive!  And no boxed cake mix is needed…

ice_cream_red_velvet_cup_for_4th_of_july_6ice_cream_red_velvet_cup_for_4th_of_july_5

ice_cream_red_velvet_cup_for_4th_of_july_1

Red Velvet Cookie Bowls
 
Ingredients
  • ¾ cup unsalted butter, at room temperature
  • ¼ cup sugar
  • ¾ cup brown sugar
  • 2 eggs
  • 1 tsp pure vanilla extract
  • 1 tsp red color paste
  • 1 box chocolate fudge pudding
  • 2½ cups all purpose flour
  • 1 tsp baking soda
  • 1 tsp salt
  • ice cream to fill cups
  • sprinkles (optional)
Instructions
  1. Preheat oven to 350F. Combine butter and sugars in mixing bowl and beat until light and fluffy. Add eggs, one at a time, scraping down the sides of the bowl as needed. Add vanilla and red color paste, and mix well. Again, scrape down the sides to be sure color is evenly distributed. Add chocolate fudge pudding mix.
  2. In a separate bowl, combine dry ingredients (flour, baking soda, salt).
  3. Mix dry ingredients into wet ingredients. Mix until just combined.
  4. On a floured surface roll out dough, until about ⅛ in thick. Use a circle cutout, or an upside down cup if you do not have one- and cut circles from the dough.
  5. Place circles in a greased jumbo muffin tin (a regular tin would work as well, but will make smaller bowls.) Using a fork, poke a few small holes in the bottom.
  6. Bake at 350F for 11-13 minutes, until bowls no longer look “wet”.
  7. Once cooled, remove from pan, top with ice cream and enjoy.

ice_cream_red_velvet_cup_for_4th_of_july_7ice_cream_red_velvet_cup_for_4th_of_july_3

Such a fun way to serve ice cream for the 4th!

shansig


Posted in recipes, something sweet | Tagged | 8 Comments

DIY makeup remover wipes

DIY Makeup Remover WipesMakeup remover wipes are fabulous, there is no question of that. Lovely scented light towelettes that cleanse our made up skin – hard not to be addicted to them. The cost for this wonderful product is what is not so lovely. And lets not forget that some brands leave the skin dry which in turn causes for the overuse of your expensive moisturizing product, not cool. Well we are about to show those packaged wipes who’s boss by making our own at home. Not only will these cost much less but you may already have everything you need already at your fingertips.

DIY Makeup Remover WipesDIY Make Remover Wipes (via The Luxury Spot)

What you’ll need:

  • 1 container with an airtight lid (one that will fit a paper towel roll cut in half)
  • 1 roll of select-a-size paper towels
  • 2 cups distilled or purified water
  • 1 T of coconut oil (found in a health foods or vitamin store)
  • 1 squirt of all natural face wash or cleansing wash

DIY Makeup Remover Wipes


  1. Use a large, sharp, non-serrated knife and cut your paper towel roll in half, brushing off the fuzz at the end.
  2. Pour 2 cups water in small bowl.
  3. Warm a tablespoon of coconut oil (just 6 to 8 seconds in microwave). Once melted, pour the oil into your water and stir.
  4. Add 1 pump all natural face wash or cleanser and stir.
  5. Pour your mixture in container.
  6. Place the paper towel rolls (cut side down) into the container with the solution (be sure to place towel underneath for overflow).
  7. Seal the lid (it may be a tight fit), turn container upside down, and let sit for 5 minutes.
  8. Remove lid, and take out the cardboard center (if there is an excess of solution not absorb by paper towel simply drain). This is where you will grab your very first homemade wipe!

DIY Makeup Remover WipesThe cleanser mixed with the coconut oil makes a fantastic scent. Better yet that same coconut oil hydrates your face leaving a silky feeling skin. I have yet to use these on my hardcore makeup days (you know, the days where the black eyeliner and you become real friendly) but they did a fabulous job removing the lighter makeup I was wearing today. Also, I came across the same technique using baby shampoo and olive oil in replace of the cleanser and coconut oil. I think you could mix and match the oil and wash, it all depends on what you have on hand.

Ok ladies, grab those knives and paper towel rolls and start making some wipes!

brandyjsig


Posted in beauty, diy | Tagged | 6 Comments

easy summer

easy_summer_3For years my least favorite season to dress for was summer.  It’s not that I dislike the season, I just feel more comfortable putting together a look that covers a bit more skin and has some additional layering options.  Last summer I made a promise to myself to embrace summer essentials like shorts and slowly but surely have begun to feel more confident.  What I really need now are more options like this black romper.  It makes me feel put together without being heavy or fussy.  That’s hot day look perfection in my book.

easy_summer_1 easy_summer_2 easy_summer_4 easy_summer_5|WEARING| black romper similar, similar/nude wedges similar/sunnies similar/ASOS clutch

brandyjsig


Posted in outfits, style | Tagged | Leave a comment